How to Position Bike Lights for Visibility
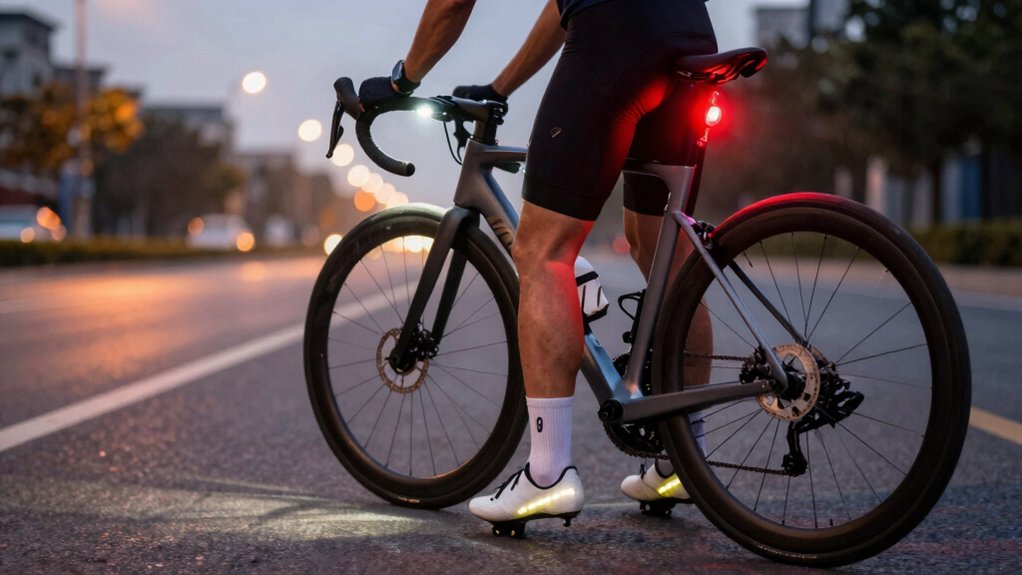
Aim a forward spot light slightly down to show distant hazards.
Mount floods low and wide to light lane edges and your silhouette.
Keep beams level and symmetric so shadows don’t hide potholes.
Use cutoff patterns or lower beam height to avoid blinding oncoming road users.
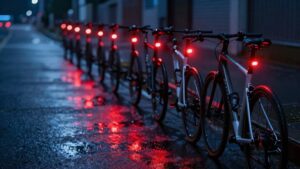
Choose white/amber fronts and red rears that meet local rules.
Seal USB ports for weather and inspect seals often.
Keep going for setup tips, mounting examples, and waterproof choices.
Quick Overview
- Mount a bright white spot light low and centered on the handlebar to illuminate distant hazards without blinding others.
- Fit wide flood lights across the bar or helmet to evenly light periphery and reduce harsh shadows near the bike.
- Aim lights slightly downward and keep flood beams symmetric to preserve lane visibility and reduce glare for oncoming road users.
- Use red rear lights at eye level and visible from multiple angles; flash modes increase detection in traffic.
- Choose lights with appropriate IP rating and sealed USB ports. Test beam patterns at 25–100 ft in expected conditions.
Beam Angle Comparison
How do beam angles change what you actually see on the road? You’ll choose beam angle and light pattern to match terrain: spot beams reach signs and hazards far ahead, flood beams fill periphery for potholes and pedestrians, and hybrids give both.
Aim spot slightly down to avoid over-illumination; keep flood level and symmetric to preserve depth. Cutoff patterns protect oncoming road users while keeping lane visibility. Mount bar floods for stable wide coverage and use a helmet spot for look-point distance.
Test modes at 25–100 ft to confirm detail and shadowing. Your safety depends on matching beam angle and light pattern to environment and speed. Then secure, adjustable mounting.
| Emotion | Choice |
|---|---|
| Relief | Clear view |
| Confidence | Controlled glare |
Legal Beam Pattern Requirements
You’ve picked beam angles to suit speed and terrain, but you also have to meet legal beam-pattern rules that protect other road users. You must know local bike law for beam shape, mounting height, and allowable glare. Many jurisdictions require a defined cutoff to avoid blinding drivers; they may restrict overly narrow spot beams on shared roads. Beam color matters too: white or amber fronts and red rears are typically mandated. Colored decorative LEDs can cause confusion and may be illegal.
- Confirm local standards for beam cutoff and maximum intensity.
- Mount lights where the beam won’t shine into the eyes of motorists or pedestrians.
- Use approved white/amber front and red rear beam color combinations.
- Keep documentation for compliant lights during stops or inspections.
USB Waterproof Rating
Check the USB waterproof rating before you mount a light so you know how it’ll handle rain, splashes, and puddles. Look for clear IP codes and understand water resistance versus fully waterproof designs. Then keep the charging port sealed and clean after rides.
Choose a higher rating (IP67 or above) if you ride in wet conditions; follow simple maintenance to avoid corrosion or failure.
Understanding IP Ratings
Wondering what those IP numbers on your bike light mean? IP ratings tell you how well a light resists dust and water so you can ride safely in wet or dusty conditions. The first digit covers solids: 0 to 6. The second covers liquids: 0 to 9K.
Aim for at least IPX4 for splash resistance, IPX6 for heavy rain, and IP67 if you want short-term submersion protection. Knowing the IP rating helps with battery optimization because sealed housings reduce corrosion and power loss.
It also supports beam customization choices: waterproof housings let you confidently mount brighter, heavier lights without worrying about exposure. Check manufacturer specs and match IP level to your typical rides to avoid failures on the road.
Water Resistance Vs Waterproof
After looking at IP ratings, you’ll want to understand the difference between a water-resistant light and a waterproof one, especially around USB ports and charging. You should treat water resistance as a limited safeguard: it handles light rain and splashes but won’t tolerate prolonged immersion or high-pressure sprays.
A true waterproof rating means seals and design protect internal electronics during harsher exposure. When choosing lights, check the waterproof rating to match your riding conditions; commuting in drizzle vs. wet-weather mountain runs demand different protection. Don’t assume a charging port is sealed; even rated lights can fail if seals are worn.
Prioritize lights with higher waterproof ratings for wet routes and inspect seals regularly to maintain safety and reliable night visibility.
Sealing USB Ports
Sealing USB Ports
How well you seal a light’s USB port can be the difference between a reliable commuter light and a dead one after a wet ride. You should check that rubber flap or screw cap sits flush and shows no cracks; replace worn plugs immediately.
Choose lights rated IP67 or higher if you often ride in heavy rain, and verify the manufacturer’s USB waterproof rating before purchase. After rides, wipe the port area dry and let it air-dry with caps open only when fully clean and protected.
For routine usb maintenance, run a quick inspection for corrosion or debris and clean gently with isopropyl swab if needed. Proper sealing and simple usb maintenance prevent failures and keep you visible and safe.
Charging Port Maintenance
Why does a light’s USB waterproof rating matter to you? It tells you how well the charging port resists rain, splashes, and puddles; this allows you to ride without shorting the battery.
For charging port maintenance, keep covers closed when not charging, wipe ports dry before opening, and avoid forcing connectors. Inspect seals and O-rings regularly; replace damaged parts to restore the specified usb waterproof rating. When cleaning, use a soft brush and isopropyl swab; don’t flush with water.
If corrosion or moisture appears inside, stop using the light until a service check confirms safe operation. Proper charging port maintenance preserves reliability and prevents electrical failures that can leave you unlit and unsafe on the road.
Choosing Rating For Riding
Keeping the charging port sealed and corrosion-free matters because it directly affects the light’s waterproof rating and your safety on wet rides. Choose a USB waterproof rating (IP67, IPX6, etc.) based on where you ride: IP67 or higher for frequent wet commutes and trail riding; IPX4 for occasional rain.
Check seals after impacts and clean contacts to preserve battery life and prevent shorts. Consider how the rating pairs with placement: handlebar mounts face splash and direct rain; helmet mounts get occasional spray. Also, weigh beam pattern: a wide pattern tolerates side spray; a focused beam needs better sealing.
Pick lights whose rated protection matches your conditions, and inspect seals before each extended wet ride.
Frequently Asked Questions
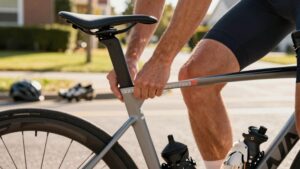
How Do I Mount Lights on Carbon Handlebars Safely?
You should use padded, low-torque mounts designed for carbon bars to guarantee balanced safety and mount compatibility. Clean the bar, fit a rubber shim or foam pad, and hand-tighten clamps to manufacturer torque specs; don’t overtighten.
Use quick-release or silicone straps rated for carbon when possible. Check alignment and security before every ride. Reinspect clamps regularly for slippage or damage to maintain safe, stable lighting.
Can Helmet Lights Legally Replace Front Lights at Night?
No, you generally can’t use a helmet light as a legal front light replacement at night. Helmet legality varies by jurisdiction; however, most laws require a fixed, handlebar-mounted front lamp visible to others.
Relying solely on a helmet light risks noncompliance and reduced visibility for drivers. Use a proper handlebar front light for legal and consistent illumination. Keep a helmet light as directional backup or supplementary lighting.
How Often Should I Clean Light Lenses for Optimal Brightness?
You should clean light lenses at least weekly for regular use, increasing cadence to after muddy, rainy, or salty rides to maintain lens brightness. Inspect before every night ride and wipe off smudges, grit, and insect splatter with a soft cloth and mild cleaner.
Deep-clean mounts and contacts monthly. Keeping a steady cleaning cadence ensures peak output; it prevents glare or scatter and preserves safety by maximizing visibility for you and others.
Are Quick-Release Mounts Secure for Off-Road Riding?
Yes, quick-release mounts can be secure for off-road riding if you choose robust, lockable models and install them correctly. You’ll want mounts rated for rough trails, tightened to the right torque, and checked before each ride.
Use anti-rotation straps, locking rings, or secondary tethers to prevent loss during heavy vibration. Don’t rely on cheap clamps; prioritize quality to maintain off road traction and consistent light stability.
What Backup Light Setup Is Best for Long Commutes?
For long commutes, the best backup light setup pairs a bright handlebar or seatpost primary with helmet lights and a compact backup clipped to your pack. You’ll carry a USB-rechargeable spare, a small battery pack, and a lightweight rear light.
Use mounts compatible with carbon handlebars, quick-release for swaps, and helmet lights angled to avoid dazzling others. This gives redundancy, easy maintenance, and reliable visibility throughout your commute.
Conclusion
Position your lights to make you seen and to see the road ahead. Aim the front beam slightly downward so it lights the road without blinding others. Mount a bright, wide-angle rear or flashing light at eye level for drivers.
Keep USB ports sealed and maintain waterproof ratings to avoid failures. Choose lights with legal beam patterns and appropriate IP ratings for your rides. Regularly check seals and charge ports so your lights work when you need them most.