Bike Chain Skipping Troubleshooting
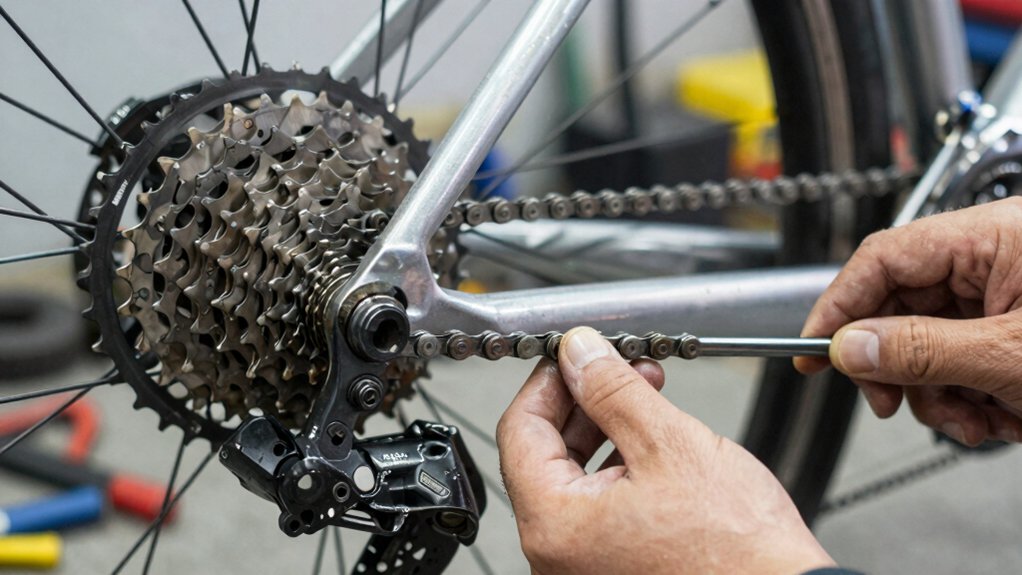
If your bike chain is skipping, start by checking chain wear with a proper gauge over a 24-link span. Replace at about 0.5–0.75% elongation to protect the cassette. Clean and relieve tension before measuring, and take multiple readings.
Confirm your clutch derailleur’s cage length and pulley spacing match the cassette and speed range so tension and wrap are correct. Adjust the tensioner or swap to a compatible derailleur. Then, test under torque to verify; more troubleshooting steps follow.
Quick Overview
- Check chain wear with a 24-link measurement or three-point gauge and replace at 0.5–0.75% elongation to avoid cassette damage.
- Inspect clutch derailleur tension and cage length to ensure sufficient chain wrap and prevent slack-induced skipping under load.
- Verify derailleur pulley-to-cassette clearance and hanger alignment; adjust or realign to stop rubbing and mis-shifts.
- Ensure chain width matches cassette speed and that derailleur clutch is compatible with your speed range.
- Clean and lube the chain, relieve tension, and take multiple readings. Test under realistic torque to confirm fixes.
Chain Wear Gauge Readings
How do you know when a chain’s past its useful life? You measure chain wear with the right tool and method, since gauge accuracy varies by type and chain. Use three-point or drop-in gauges for reliable readings; two-point tools can misread due to roller wear.
For precision, measure a 24-link span with a ruler or calipers. Clean the chain, relieve tension, and take multiple readings across links.
| Gauge Type | Strength | Limitation |
|---|---|---|
| Two-point | Quick field check | Roller wear skews result |
| Three-point | Better accuracy | Slower, needs two hands |
| Ruler/Caliper | Highest precision | Requires light, clean chain |
Replace at 0.5%–0.75% depending on speed class to prevent cassette wear.
.75% Chain Elongation
% chain elongation tells you how much a chain has stretched compared with its original pitch, and you’ll use that percentage to decide whether to replace the chain before it wears the cassette and chainrings. You measure elongation with a chain wear gauge or a ruler, reading percent elongation against the tool’s marks. Track percent values: 0.5% often signals replacement on 10-12 speed; 0.75–1.0% on wider systems.
Use a chain wear gauge for quick, consistent checks. Compare percent elongation to manufacturer’s limits and wear indicators. Replace the chain at the recommended percent to prevent cassette and chainring damage.
Be systematic: check after heavy miles or when skipping under load. Treat chain stretch as a leading indicator and act before cassette wear accelerates.
Clutch Derailleur Compatibility
Check the derailleur’s clutch function first: it should maintain chain tension under load to prevent skipping. Confirm the cage length and pulley spacing match your cassette width so the derailleur can wrap enough chain and keep proper tension.
If chain wrap or tension looks short, adjust the tensioner or swap to a compatible-width clutch derailleur to restore reliable engagement.
Clutch Mechanism Purpose
Ever wondered why some derailleurs feel so stable on rough trails while others let the chain slap and drop? The clutch mechanism controls cage tension to keep the chain engaged over bumps. You’ll check whether your derailleur has a clutch and whether its tension is adjustable; that’s the core of derailleur compatibility with rough-ride demands.
If the clutch is weak or absent, expect chain slap, louder skips, and occasional drops under load. When swapping derailleurs, match clutch type to your riding: rigid clutch for off-road, lighter or no clutch for road setups where low drag matters. Adjust or service the clutch per manufacturer steps to restore proper tension. Proper clutch mechanism choice reduces skipping and improves chain retention.
Derailleur Width Compatibility
How do you know a clutch derailleur will work with your drivetrain? Check derailleur width against your chain and cassette spacing first. Measure chain width (e.g., 11-speed) and confirm the clutch cage clears adjacent cogs without rubbing.
Next, compare pulley-to-cassette clearance and hanger alignment; tight fits cause compatibility issues under load and lead to skipping.
Verify the clutch’s design matches your derailleur’s intended speed range: some clutches are optimized for narrower modern chains. If you retrofit a stronger clutch, test shifting under realistic torque to catch hidden interference.
Finally, consult manufacturer specs and, when in doubt, swap parts incrementally: chain, then cassette, then clutch derailleur. That methodical approach prevents mismatched parts and avoids load-related skip surprises.
Cage Length Effects
After you’ve confirmed clutch compatibility with chain and cassette spacing, cage length becomes the next factor to assess because it controls chain wrap and tension across gear ranges. You’ll check that cage length matches derailleur compatibility for your cassette range and chainstay length.
A cage that’s too short can’t absorb chain slack in big-big combinations, causing excess tension and unpredictable chain behavior. A cage that’s too long can allow excessive movement, letting the chain skip under heavy torque when riding small cogs.
Inspect mounting, ensure Rear Derailleur hanger alignment, and verify pulley spacing remains within manufacturer specs. If you swap cassettes or change chainrings, re-evaluate cage length versus derailleur compatibility rather than assuming existing setup will cope. Adjust or replace the cage as needed.
Chain Wrap Requirements
Chain wrap determines how much chain the derailleur can hold around the cassette and chainring. You should confirm your clutch derailleur provides enough wrap to keep tension across your gear range. Check specification charts for maximum cassette size and total tooth capacity; match that to your largest ring and cog combination.
If your derailleur lacks sufficient chain wrap, you’ll see slack in small cogs and skipping under load. Measure chain elongation and replace the chain before it accelerates cassette wear that increases required wrap. Fit a clutch-equipped derailleur rated for your drivetrain, or use a longer cage if compatible.
After installation, ride test high-torque situations to confirm the clutch maintains tension without overloading pulleys or compromising shifting.
Tensioner Adjustment Tips
Want your clutch derailleur to stop slack-related skips? Start by checking derailleur tension with the chain on the smallest cog and smallest chainring. The clutch should hold but allow smooth pulley rotation.
For tensioner adjustment, first shift to the largest cog and back to release cable slack. Then tighten the B-tension screw until the pulley just clears the largest cog teeth. Adjust cable tension at the barrel adjuster so shifts are crisp under light load. If skips persist under power, increase derailleur tension incrementally.
Test on a hill or with heavy pedaling to replicate load-specific skipping. If the clutch feels weak or noisy after adjustment, inspect for wear or incompatibility. Replace the clutch derailleur or upgrade the tensioner spring as needed for reliable anti-skip performance.
Frequently Asked Questions
Why Does Skipping Only Happen Uphill Under Heavy Torque?
Because heavy uphill torque exceeds imperfect engagement, your drivetrain slips when load stresses upshift mechanics and worn parts. Under load, the chain can lift or jump if chain wear interactions have stretched links or the cassette/chainring teeth are worn. Cables or derailleur slack that seem fine unloaded worsen under torque.
You should test smallest cogs under load; add rear derailleur tension, and replace worn chain and cassette together.
Can a New Cassette Reduce Skipping Without Replacing the Chain?
Yes, you can sometimes reduce skipping by fitting a new cassette, but only if chain compatibility is good. You’ll check chain wear and measure stretch first. A worn chain riding on a fresh cassette often still skips because teeth spacing differs. If the chain’s near-new, a new cassette can restore reliable engagement.
If the chain’s stretched, replace it or install both together to ensure long-term, load-resistant shifting.
How Do Stretched Shifter Cables Cause Skipping Under Load?
Stretched cables cause skipping under load by increasing shifting tolerance; thus, the derailleur can’t hold precise gear alignment when torque rises. You’ll feel the chain jump or ping only under hard pedaling because cable stretch lets the indexing drift just enough for the chain to sit between cogs.
You should tighten or replace stretched cables, then re-index and test under load to restore crisp shifts and eliminate load-specific skipping.
Why Does Skipping Occur Mostly in the Smallest Rear Cog?
Because the smallest cog puts the chain on the tightest, most worn teeth, you get slack under load and it skips. You’ll want two word discussion ideas like “wear pattern” and “cable slack” when troubleshooting.
Don’t buy troubleshooting myths: new chain on worn cassette often skips. Methodically inspect small-cog teeth, test under load, check chain stretch, and increase derailleur cable tension or replace cassette and chain together if wear shows.
When Should I Replace Chainrings Versus Cassette or Chain?
Replace chainrings when chainring wear causes poor engagement, frequent dropping, or a new chain still skips on big/small rings. Swap the cassette when its teeth are hooked, a new chain skips under load, or cassette tension can’t be fixed by adjusting derailleur cable.
Always replace the chain at regular wear intervals to protect both. If cassette and chainring are both worn, replace them together for reliable shifting and longevity.
Conclusion
You’ll diagnose skipping by measuring chain elongation first: .75% means replacement soon.
Check that your clutch derailleur matches the cassette and that its clutch mechanism is functioning; it controls chain stability under load. Make sure derailleur inner/outer width fits your chain, and choose cage length that provides proper chain wrap.
Confirm the chain wraps enough gears and adjust any tensioner to remove slack. Do these methodically and you’ll stop most skipping issues.
Related reading: How to Clean a Bike Drivetrain Properly — a closer look at this topic.