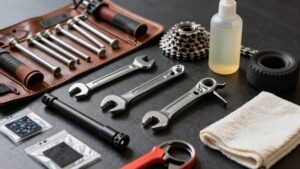
What to Carry in a Basic Bike Repair Kit
You should carry at least two spare inner tubes sized to your wheels and tire width, a mix of Presta (40mm and 60–80mm) and one Schrader. You also need a pump or CO2 with the correct head or adapter, tire levers, a sealed patch kit with fresh glue, valve extenders or grommets for deep rims, and a small multi-tool.
Store patches cool and dry; rotate glue yearly. Keep a simple log so you’ll know when to replace items and can learn more.
Quick Overview
- One or two spare inner tubes matching wheel diameter and tire width, including 40mm and 60mm Presta options plus one Schrader.
- A compact patch kit (patches, glue, sandpaper) stored sealed, labeled with purchase/open date, and rotated yearly.
- A multi-tool with tire levers, hex keys, Torx, and a chain tool for common roadside repairs.
- A pump or CO2 inflator plus Presta/Schrader adapters and a valve hole reducer or grommet for deep rims.
- Tire levers, a small roll of self-adhesive tubeless tape/zip tie, and a minimal first-aid/repair tape for temporary fixes.
Tire Valve & Tube Sizes
When you pack tubes, start by matching valve length and type to your rims. Measure rim depth to pick a Presta valve length (common 32–80mm) or confirm the larger hole needed for Schrader valves (≈8.5–9mm). You’ll select inner tube sizes by tire width and wheel diameter. 700×20–25mm tubes need shorter Presta valves; deeper rims demand 48–80mm. Verify rim hole diameter before choosing a tire valve type.
Carry a mix: a 40mm Presta, a longer 60mm for deep rims, and at least one Schrader if needed. Include a valve hole reducer or rubber grommet for flexibility. Be methodical: label tubes by size and valve length for quick roadside swaps.
| Valve | Recommended Use |
|---|---|
| Presta 40mm | Standard rims |
| Schrader | Mountain/hybrid rims |
Valve Type Compatibility Chart
Wondering which valve works with your rims and pump head? You need a quick compatibility check to match valve types to rim holes, pump heads, and tube sizing. Use this chart-style guide to avoid surprises on the road.
- Presta: narrow stem, fits road rims; often requires a compatible pump head or adapter.
- Schrader: wider stem, fits car-style openings and most MTB rims; works with standard pumps.
- Dunlop (Woods): common in some regions; may need adapter for modern pumps.
- Valve extender: for deep-section rims; confirm tube sizing and thread type before fitting.
Check rim hole diameter, pump head fit, and tube sizing when packing spares. Ensure replacements work immediately.
Patch Kit Expiration Dates
Check the patch kit label for a manufacture or expiry date, because patch shelf life varies and glue potency drops with time.
Store patches in a cool, dry place away from sunlight and temperature swings to limit adhesive breakdown and rubber degradation. If glue is gummy, patches peel easily, or kits are several years old, replace the glue and patches before your next ride.
Shelf Life Of Patches
Patches and glue have a limited effective life. You should inspect and replace kit components periodically to avoid failures on the road. Check manufacturer dates and labels to track patch kit expiration. Note that many kits list a recommended service life of 3–5 years.
You’ll look for visible signs of patch material degradation: brittleness, cracking, loss of tack on self-adhesive patches, or thickened/skin-formed glue in vials. Test a single patch at home before a ride when in doubt. Replace any item that shows deterioration or has exceeded the labeled timeframe.
Keep a simple log or sticker inside your kit with the purchase or opened date so you can rotate supplies reliably and avoid surprises.
Storage Conditions Matter
How should you store your patch kit to keep it usable? Keep it dry, cool, and away from direct sunlight to slow adhesive breakdown. Store kits in a sealed plastic bag or small hard case inside your repair bag; that controls humidity and prevents accidental crushing.
Avoid leaving kits in a hot car or exposed to freezing temperatures, since extreme swings accelerate deterioration and can shorten patch kit expiration. Check packets periodically for corrosion, sticky residue, or torn backing; dispose of compromised items.
Label purchase or open date so you can track age and rotate supplies yearly. Proper storage conditions extend usable life and ensure patches work when you need them, reducing roadside failures and wasted effort.
Glue Potency Over Time
Why does glue lose its grip over time? You store patch kits and forget that solvent-based adhesives evaporate, thicken, and polymerize, reducing glue potency. Check manufacture or use-by dates on tubes and rotate kits annually if you ride frequently.
Small tubes dry faster; choose tube sizes that match your repair frequency: 2–5 ml for occasional rides, 10–20 ml if you patch often. Keep tubes sealed, capped, and in a cool, stable place to slow degradation. Test an old tube on a scrap of inner tube before relying on it on the road. A weak bond or stringy glue signals replacement. Replace any tube with hardened or discolored adhesive.
Proper inventory and simple testing prevent failed roadside repairs.
Patch Material Degradation
When should you replace the patches in your kit? Check the patch degradation signs and shelf life indicators before relying on them. Inspect patch backing: brittle edges, loss of tack, or visible drying mean reduced adhesion.
Smell glue packets; chemical breakdown often produces a sharp or faint odor that signals decline. Note manufacture or sell-by dates when present; treat unopened kits as having a practical shelf life of about 3 to 5 years depending on storage.
Store patches in a cool, dry place away from sunlight and heat to slow degradation. When a patch fails during a test or repair, retire the remaining patches from active use and replace the kit. Keep a simple log or reminder to reassess kits annually.
When To Replace Kit Items
Want to know if the patch kit in your bag is still reliable? Check dates and condition: glue dries, patches lose adhesion, and fabric backing can crumble. Inspect glue canisters for thickening or separation. Squeeze a small amount onto paper to confirm tack and cure time.
Replace patches that peel, crack, or show corrosion on metal tins. Set a replacement interval every 2–3 years for typical kits; replace sooner if stored in heat or sunlight. Apply the same routine to CO2 cartridges: check puncture seals and spare tubes; inspect for dry-rot.
Don’t confuse maintenance with unrelated topics or toss items while handling off topic items. Keep a dedicated checklist. Dispose of expired components and restock immediately to stay ready.
Frequently Asked Questions
Do I Need CO2 Cartridges or a Hand Pump for Regular Rides?
You don’t strictly need CO2 cartridges or a hand pump, but you should carry one of them. CO2 cartridges inflate tires quickly and compactly for fast fixes. A hand pump is reusable and reliable if you run out of cartridges or need many pumps.
Pick based on ride length and convenience: carry CO2 for short, fast rides. Take a hand pump for longer trips or solo rides where resupply isn’t possible.
How Many Spare Spokes Should I Carry for Long Trips?
Carry six spare spokes for long trips; that spoke count covers most single-wheel failures and lets you replace multiple broken spokes if needed. You’ll also pack matching spoke nipples and a spoke wrench so you can install and tension stays properly.
If you ride rough terrain or heavy loads, double that to twelve. Store them with a small spoke card or label indicating length and gauge for quick identification.
Can I Use Multi-Tool Chain Tool for All Chain Sizes?
You can’t assume one chain tool fits all chains. Compatibility questions matter: some multi-tool chain tools handle common 8–12 speed pins, but many struggle with thicker master links. E-bike chains or some proprietary pins may also present issues.
Check your chain’s speed rating and pin size. Test the tool on a spare link, and carry a quick-link or dedicated chain tool for your specific chain if you ride varied bikes or long trips. This way, you can avoid being stranded.
What Cash and ID Should I Keep in the Kit?
Keep a few cash ideas: A couple singles and a ten for quick repairs, transport, or a vending emergency.
For ID considerations, carry a photocopy of your license and insurance card (sealed in a zip bag) plus a credit card as backup. Tuck items into a small waterproof pouch with a contact card listing emergency contact and blood type.
Replace cash and documents after use and check pouch before each ride.
Should I Include a Zip Tie and Duct Tape for Quick Fixes?
Yes, include a zip tie and duct tape. You’ll use a zip tie to secure loose cables, hold broken racks, or temporarily fasten components.
Duct tape patches torn saddles, wraps split tubes until you can patch, and bundles small parts. Pack a few short zip ties and a small roll or folded squares of duct tape in a waterproof bag. They’re lightweight, versatile, and often save a ride from becoming a walk.
Conclusion
You’ll want to check valve and tube sizes, match valve types, and rotate patch supplies before they fail. Store patches and glue cool and dry, and note expiration dates: glue loses potency and patch material degrades.
Replace tubes showing wear and refresh sealant and spare tubes seasonally or after visible aging. Keep a tidy kit, log expiration or replacement dates, and inspect before rides so you’re ready to fix flats quickly and reliably.
Related: Bike Maintenance Toolkit Checklist