Bike Fit Basics for Beginners
You’ll set a comfortable, efficient fit by tuning saddle height (inseam × 0.883 to 1.09), fore‑aft, reach, cleats and float to your anatomy.
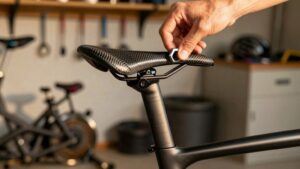
Start with the heel method and small 2–3 mm saddle changes.
Then align cleats for correct knee tracking using front‑view video.
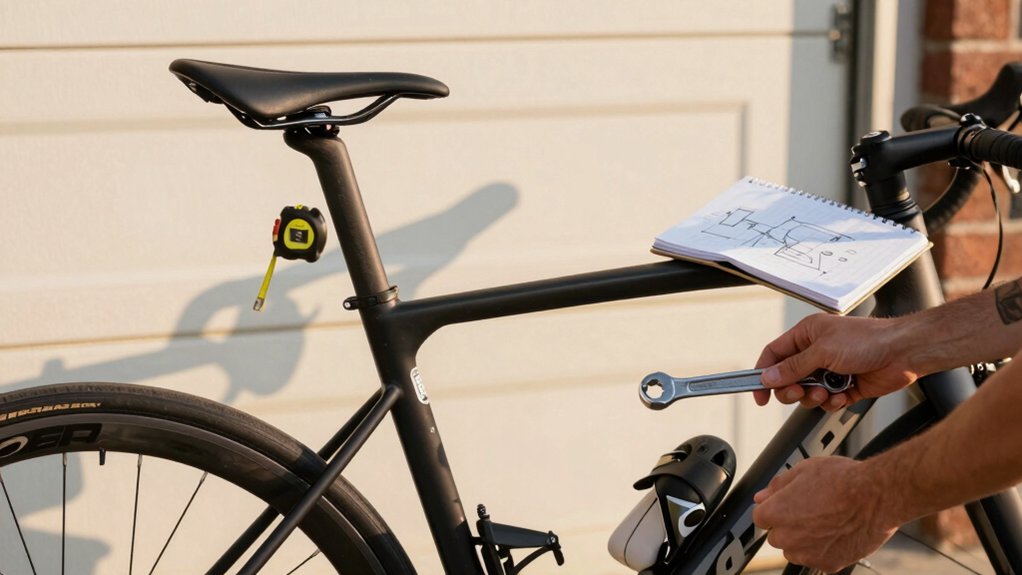
Use calibrated torque values on the clamp, stem and rails; recheck after 50–100 km.
Begin with modest float (6–12° road, 0–4° track) and adjust for pain‑free motion.
Keep going and you’ll get practical step‑by‑step guidance.
Quick Overview
- Set saddle height using inseam-based formulas (inseam × 0.883 or × 1.09) and confirm with slight knee bend at the 6 o’clock pedal position.
- Adjust saddle fore-aft and reach using the elbow-to-fingertip rule for saddle-to-bar distance. Fine-tune in 2–3 mm steps.
- Position cleats to align knee tracking over the pedal spindle and start with modest float (road 6–12°; track 0–4°).
- Use a calibrated torque wrench to torque seatpost, stem, handlebar, and seat rail bolts to spec. Recheck after 50–100 km.
- Film a front-view pedal stroke to monitor knee tracking. Adjust cleat float/tension for pain-free motion and record settings.
Saddle Height & Reach Chart
How high should your saddle sit? You use inseam-based formulas (Lemond, Hamley, 109%) as starting saddle height values. Then verify heel method and knee tracking during a static pedal at 6 o’clock. Refer to a reach chart to set saddle-to-bar distance and confirm elbow rule alignment.
| Measurement | Recommended |
|---|---|
| Lemond/Hamley | Inseam×0.883 / ×1.09 |
| Heel check | Slight bend at 6 o’clock |
| Reach chart | Elbow-to-fingertip rule |
| Fine-tune | 2–3mm increments |
Watch knee tracking; misalignment signals cleat adjustment. Cleat float explained: float ranges let natural rotation. Adjusting float affects knee path. Note torque values for clamp bolts per manufacturer; save detailed torque values quick reference for the next section.
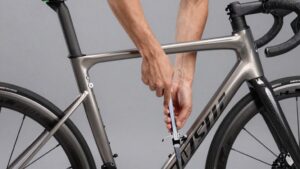
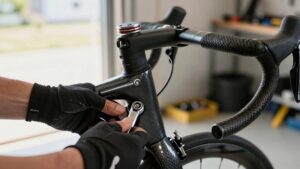
Torque Values Quick Reference
After you’ve set saddle height, fore-aft, and cleats, check fastener torque to keep components secure and aligned. Over- or under-tightening alters fit and can damage parts. You’ll use specified torque values to maintain repeatable alignment and protect threads.
Work methodically with a calibrated torque wrench, tightening bolts to manufacturer specs in a star pattern where applicable. Verify seatpost clamp, stem faceplate, handlebar clamp, and seat rail bolts. Watch knee tracking during a short pedal stroke after each adjustment; uneven torque can subtly rotate components and shift cleat orientation.
- Seatpost clamp: 5–8 Nm
- Stem faceplate: 6–10 Nm (follow spacer stack)
- Cleat bolts: 6–8 Nm
Record values and recheck after 50–100 km.
Cleat Float Adjustment Range
Cleat float is the angular freedom your shoe has on the pedal. You’ll need to decide between fixed and float settings based on your joint mobility and riding style. Start with a modest float (6–12 degrees for many road riders; 0–4 degrees for track or fixed-ride setups) and increase only if your knee tracking shows lateral strain.
Adjust tension gradually. Test on short rides, and watch knee alignment in the sagittal and frontal planes to ensure you’re not introducing valgus or varus motion.
What Is Float
Why does “float” matter when you clip in? Float terminology defines the angular freedom your foot has while engaged: degrees of rotation allowed before the cleat releases. You’ll see manufacturers list 0° (fixed), 4°, 6°, 9° and so on; those numbers quantify pedal float.
Pedal float reduces torsional stress at the knee by permitting micro-rotation during each stroke and when shifting positions. For setup, choose float that matches your natural tibial rotation. Too little can force joint twisting; too much can feel unstable. Measure comfortable range by pedaling and noting spontaneous foot rotation under load. Record the preferred degree and match cleat models or shims accordingly.
Precise float selection minimizes knee strain and preserves efficient power transfer without overconstraining motion.
Fixed Versus Float
Curious how much rotation you should allow when your foot’s clipped in? You’ll evaluate fixed versus float as a subtopic overview of cleat behavior. Fixed systems lock your foot position; they eliminate rotational play and provide direct power transfer. However, they increase joint stress if alignment’s imperfect.
Float systems permit controlled rotation; they use float terminology to describe degrees of free rotation: typically angular range before release. When you set cleats, consider knee tracking and natural stance. Less float improves feedback; more float reduces torsional load. You’ll measure float against your anatomy and riding style, not aesthetics.
Adjust incrementally, test on short rides, and prioritize pain-free motion. Accurate observation and small changes prevent misalignment injuries and preserve pedaling efficiency.
Recommended Float Ranges
How much rotational play should you allow when setting up float? You’ll usually choose between 0°, 4–6°, or 8–15° per cleat system; pick a range that mirrors your unloaded natural foot rotation. Beginners with stable knees often start at 4–6° to balance freedom and control.
If you have habitual external rotation, 8–15° reduces torsion on the knee. Zero float suits experienced, injury-free riders who need precise power transfer.
Monitor saddle comfort and pedal wear after a few rides. Increasing float can relieve lateral knee pressure but may shift contact points, affecting pedal wear patterns. Make one-variable changes and record symptoms. Use controlled increments; avoid extreme float that introduces instability or inefficient stroke mechanics.
Adjusting Float Safely
Wondering how much rotational freedom to allow under load? You’ll set cleat float to balance pedaling efficiency and float safety. Start with manufacturer-recommended minimums. Then increase float gradually while testing short, high-cadence efforts and sustained climbs.
Watch for smooth, symmetrical rotation that doesn’t force compensatory hip or ankle motion. If your ankle alignment shifts laterally when loaded, reduce float or reposition the cleat fore-aft and rotationally until the ankle tracks naturally through the stroke. Use small incremental changes: 2–4 degrees or single detent steps, documenting each trial.
Prioritize reproducible comfort over maximum rotational play; excessive float masks maladaptive movement and compromises power transfer. Confirm settings on both feet under realistic loads before locking them in.
Monitoring Knee Tracking
Why does knee tracking matter under different float settings? You’ll observe knee movement relative to pedal alignment to prevent lateral stress. Start with neutral float and ride short intervals while filming from the front. Note knees alignment over the pedal spindle through the stroke.
If knees drift inward or outward, incrementally increase or decrease cleat float and reassess. Aim for consistent vertical tracking without abrupt lateral excursions. Use visual markers on the crank or a mirror for repeatable measures. Small float changes (2–6 degrees) often correct misalignment; larger ranges suit anatomical variability but can mask instability.
Document settings, symptoms, and comfort. Precise, iterative adjustments tie cleat float to pedal alignment, protecting joints and optimizing power transfer.
Frequently Asked Questions
How Do I Check Knee Tracking While Pedaling?
Watch from the front or use a mirror while you pedal at moderate cadence. Observe knee tracking relative to pedal spindle and straight line over your foot. Record video and pause at top and bottom to check alignment.
If knees drift inward or outward, tweak cleat angle, stance width, or saddle fore-aft. Keep pedaling technique smooth; avoid rapid cross-over. Reassess until knees track vertically over pedals throughout the stroke.
Can I Use a Smartphone for Saddle Level and Alignment?
Yes, you can use a smartphone for saddle level and alignment. Use smartphone apps with a bubble-level or inclinometer to set saddle angle flat and check tiny nose-up adjustments. Confirm saddle height by observing pedal cadence and smooth stroke while sitting.
For fore-aft alignment, use smartphone alignment guides to line knee over pedal spindle. Do not rely solely on apps; verify comfort, knee tracking, and power across rides.
How Often Should I Re-Check Cleat Alignment?
Check cleat alignment every 3–6 months and any time you notice cleat wear, discomfort, or altered clipless pedaling engagement. Inspect for rotation, fore-aft shift, and uneven wear after 500–1,000 miles or after installing new shoes or cleats.
Re-check immediately if you feel knee pain, lateral tracking, or slipping. Small micro-adjustments restore efficient force transfer and prevent long-term issues from misalignment. Keep records of settings and mileage for consistency.
What’s the Best Way to Relieve Numb Hands on Long Rides?
You reduce numb hands relief on long rides by changing hand position, rotating grips, and unloading weight from your hands regularly. Check bar width, hood angle, and saddle-to-bar height to shift load; small stem or bar tilt changes can help.
Use padded gloves, foam tape, or ergonomic bar tape. Stand briefly every 10 to 20 minutes to restore circulation. Track symptoms and fine-tune fit to maintain long ride comfort.
When Should I Consult a Professional Bike Fitter?
You should consult a professional bike fitter when to assess fit becomes unclear or when persistent signs of misfit appear. If you get recurring knee pain, numb hands, lower back strain, or inefficient power transfer despite basic adjustments, book a pro.
Also, seek a fitter after a significant injury, body change, or new bike/component. A fitter will quantify alignment, saddle height/fore-aft, cleat setup, and reach to resolve biomechanical issues precisely.
Conclusion
You’ve learned the core fit elements: saddle height and reach, torque specs, and cleat float, and how they interact to protect knees and improve power transfer. Use factory torque values, set cleat float within recommended ranges, and observe knee tracking during varied cadences and loads.
Prefer controlled float if you’re prone to medial/lateral drift. Consider fixed only with professional oversight. Make incremental adjustments, document settings, and reassess ride-by-ride to confirm comfort and alignment.
Related: How to Set Saddle Height Correctly
Related: Bike Saddle Height Calculator
Related: How to Prevent Knee Pain From
Related: How to Set up Cleat Position
Related: How to Set Saddle Fore-Aft Position