How to Check Wheel Bearing Play
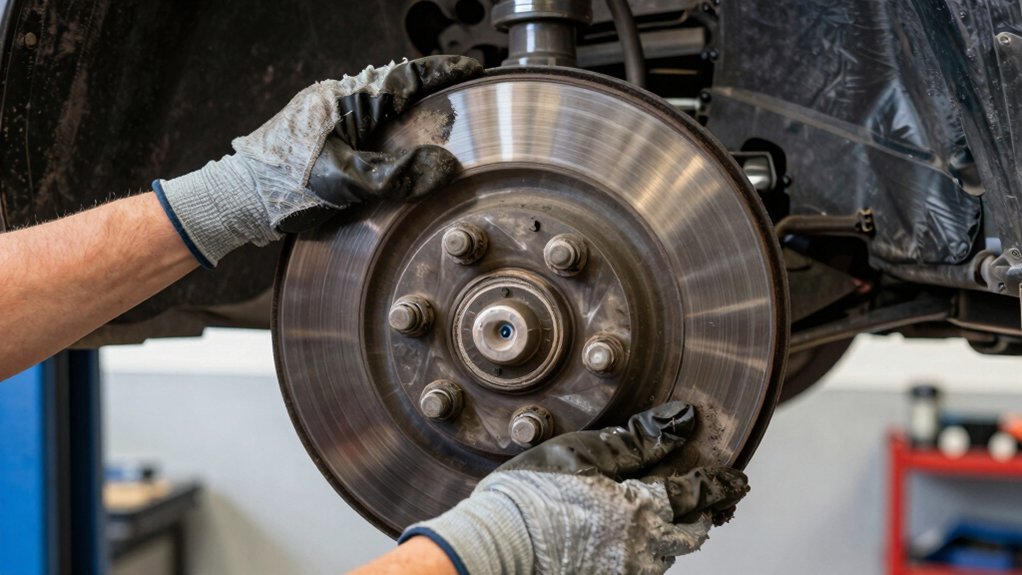
You’ll check wheel-bearing play with a dial indicator by measuring axial end-play and verifying preload/torque: secure the vehicle, set a baseline idle RPM, zero the indicator against the hub, then push–pull the hub or slowly ramp RPM (typically 1,200–1,800) while watching for movement beyond 0.025–0.127 mm (0.001–0.005″) for most cars.
Follow the manufacturer’s spindle-nut torque and recheck. Log all readings and limits, and keep going for step‑by‑step adjustment and RPM notes.
Quick Overview
- Secure vehicle, lift wheel off ground, and remove hub cap or wheel as needed to access the hub or spindle.
- Use a calibrated dial indicator or micrometer method to measure axial end-play at the hub; do not measure by finger or wheel wiggle.
- Record baseline idle RPM and tighten spindle nut to manufacturer preload. Then, re-measure end-play with the dial indicator.
- Perform a slow RPM-dependent check (1,200 to 1,800 RPM) while monitoring the indicator for increased play or movement.
- Compare readings to manufacturer tolerances (typically 0.025 to 0.127 mm). Adjust preload or replace bearings if out of spec.
Typical Play Tolerance (mm)
How much play is acceptable in wheel bearings? You’ll aim for 0.025–0.127 mm (0.001”–0.005”) as the standard tolerance. FWD hubs should show essentially zero play. RWD fronts can accept up to 0.254 mm (0.010”) in some cases. Use a dial indicator to verify; don’t confuse this with an irrelevant topic or an unrelated factor like tire wear.
| Vehicle Type | End Play (mm) | Note |
|---|---|---|
| Most FWD cars | 0.000–0.000 | Sealed assemblies, zero play |
| RWD fronts | 0.025–0.127 | Up to 0.254 mm acceptable |
| Trucks | 0.025–0.127 | Conservative standard |
Keep measurements methodical. Record values and adjust per manufacturer limits to avoid premature failure.
Torque, Axial Play Limits
Why does torque control matter when setting axial play? You set torque to control preload; too little and you’ll have subtopic irrelevance where looseness mimics bearing failure. Too much, and you preload past limits. Use torque values to achieve specified end play without unrelated focus on unrelated parts.
- Visualize tightening until rotor resists, then back off to specified preload.
- Picture the dial indicator reading settle at 0.001”–0.005” as you confirm final torque.
- Imagine over-torque causing excess heat and seal damage even if static play seems acceptable.
Work methodically: follow spindle nut torque specs. Apply final 20–30 in·lbs for zero-play cases, then verify with a dial indicator. Record readings and repeat if out of range.
Rpm-Dependent Play Limits
Start your rpm-dependent checks at idle rpm as a stable baseline. Then note how play changes as you raise engine and wheel speed toward a safe upper limit. Watch for vibration thresholds: rumble, growl, or shudder; since those symptoms can reveal play that’s only apparent at certain speeds. Remember measurement techniques (dial indicator vs. dynamic feel) can yield different results.
Also factor vehicle load and steering angle. Axle load and cornering forces will change effective end play and the speed at which symptoms appear.
Idle Rpm Baseline
Wondering how engine idle affects wheel bearing play? You should establish an idle RPM baseline clarification before measuring. With car neutral, parking brake set, and wheels off the ground or supported safely, let the engine reach normal idle RPM and confirm it with a tachometer.
Note that some vehicles have higher or lower factory idle; record the exact RPM as your baseline. Zero your dial indicator after seating the bearings at that idle.
Perform the push-pull or indicator method while the engine is held at baseline RPM. Small RPM changes can alter measured preload on some hub types. If you must rev slightly for access, return to baseline RPM and re-zero before taking the definitive end-play reading.
Safe Upper Limit
Having established and zeroed your baseline idle RPM, you should now set a safe upper limit for checking RPM-dependent play to avoid masking preload or causing bearing damage. You’ll pick an RPM that’s high enough to reveal looseness but low enough to avoid heating or altering preload; typically 1,200–1,800 RPM for most light vehicles unless the manufacturer specifies otherwise.
Subtopic relevance: This limit ensures measurements reflect true end play, not dynamic effects.
Safety considerations: Never exceed the vehicle or hub-rated speed, secure the vehicle, and keep clear of rotating parts. Ramp RPM slowly, hold briefly while observing the dial indicator, then return to idle. Record RPM and readings; repeat for consistency.
Vibration Threshold Indicators
Why monitor RPM when checking bearing play? You’ll detect when small axial or radial looseness becomes vibration. As RPM rises, imbalance and play amplify; a bearing that reads acceptable at idle can generate harsh vibration at road speed.
Use controlled spin increments and note the RPM where you first feel or measure vibration. Then correlate to operator reports. Don’t confuse resonant noise with unrelated topic chatter like tire imbalance; verify by swapping wheels or using chassis restraints.
Log RPM thresholds and corresponding end-play measurements to set service limits for that vehicle. Avoid random exploration; be systematic: increment RPM, record symptoms, remeasure play, then decide repair or adjustment based on documented thresholds.
Measurement Techniques Vary
RPM checks you performed give context for why measurement techniques must account for speed. Play that’s acceptable at idle can produce vibration as RPM climbs. You’ll select a method that relates to operating conditions: static dial-indicator end-play measurement for preload verification and dynamic spin checks for RPM-sensitive looseness.
Don’t confuse a quick finger-pull or chassis bounce as definitive; those can be an irrelevant measurement compared with instrumented readings. Calibrate your dial indicator before testing and don’t rely on an unrelated calibration from another tool. When spinning the hub, note RPM at which vibration begins and correlate that to measured end play.
Record both static and dynamic data, then compare to spec ranges so you can decide whether adjustment or replacement is required.
Impact Of Load
Because load and rotational speed change bearing behavior, you need to evaluate end play both statically and under rpm to capture real-world limits. When you test, remember impact load shifts internal clearances: a sudden side load or heavy vertical load compresses the contact zone and can reduce measured play. Conversely, centrifugal forces at higher RPM can open clearances slightly.
Measure with the dial indicator at rest; then run the hub at controlled RPM and re-measure. Document differences. Use safe speeds and a secure fixture. Note RPM dependent changes and correlate them to allowable end play ranges for your application. If play increases beyond spec under rpm or load, adjust preload or replace bearings to prevent noise, seal leakage, and premature failure.
Frequently Asked Questions
How Do I Tell if a Bearing Is Noisy but Still Within Play Limits?
You can detect a noisy bearing within play limits by performing a noise assessment: listen for growling, grinding, or rhythmic sounds while rotating the hub at low and higher speeds.
Use a stethoscope or mechanic’s probe to localize noise. Compare symptoms against wear indicators such as seal damage, metal particles, or heat discoloration.
If noise exists without excessive end play, plan replacement. Audible deterioration and wear indicators mean imminent failure despite acceptable play.
Can I Drive Home With Slight Wheel Bearing Play?
You can drive home with slight wheel bearing play only if it’s within acceptable limits and feels stable; don’t push it.
Monitor for increasing bearing wear, road noise, vibration, or seal leaks. Drive slowly, avoid highway speeds and heavy loads, and get bearings inspected and adjusted or replaced ASAP.
If end play exceeds recommended spec or noise/vibration worsens, stop driving and repair immediately to prevent hub, spindle, or bearing failure.
How Often Should Wheel Bearings Be Inspected or Serviced?
You should inspect wheel bearings at least every 12 months or 12,000–15,000 miles. Service them whenever you notice symptoms. Don’t let topic drift or unrelated maintenance delay checks. If you tow, carry heavy loads, or drive rough roads, inspect every 6,000–8,000 miles.
PreSet hubs follow factory intervals. Always recheck after wheel work, seal leaks, or noise. Address excessive end play immediately to avoid spindle or bearing damage.
Are Hub Assemblies Interchangeable Between Vehicle Models?
No, hub assemblies aren’t universally interchangeable. You’ll need to confirm hub compatibility because model to model differences matter: bolt pattern, spline count, ABS tone ring, bearing type, and mounting flange dimensions vary.
Check OEM part numbers, vehicle fitment guides, and sensor compatibility. If dimensions and electrical connectors match, you can swap; otherwise, replace with the exact specified assembly to avoid premature failure or safety issues.
Can Wheel Alignment Affect Perceived Bearing Play?
Yes, wheel alignment can affect perceived bearing play. If toe, camber, or thrust angles are off, they can create uneven loads that mimic bearing misalignment and amplify end play sensations.
You’ll want to confirm true bearing movement with a dial indicator or push-pull test before replacing parts. Correct alignment first; then re-measure end play. If excessive movement remains, inspect bearings, hubs, and spindle for actual bearing misalignment or wear.
Conclusion
You’ve now got the fundamentals to check wheel bearing play reliably. Start by establishing idle RPM. Then measure axial and radial play with the wheel unloaded and at specified torque. Note any increase at higher RPMs or under simulated load.
Use calipers, dial indicators, or a feeler gauge and compare against the typical tolerance and safe upper limits. If vibration or play exceeds thresholds, replace the bearing; don’t risk uneven wear or failure.