Wheel Truing Basics Explained
You’ll true a wheel by correcting lateral wobble and radial hop with spoke turns while keeping spokes evenly tensioned. Aim roughly 0.2–0.5 mm lateral and 0.5–1.0 mm radial for pro-level work; 0.2–2 mm lateral, 0.5–4 mm radial more generally.
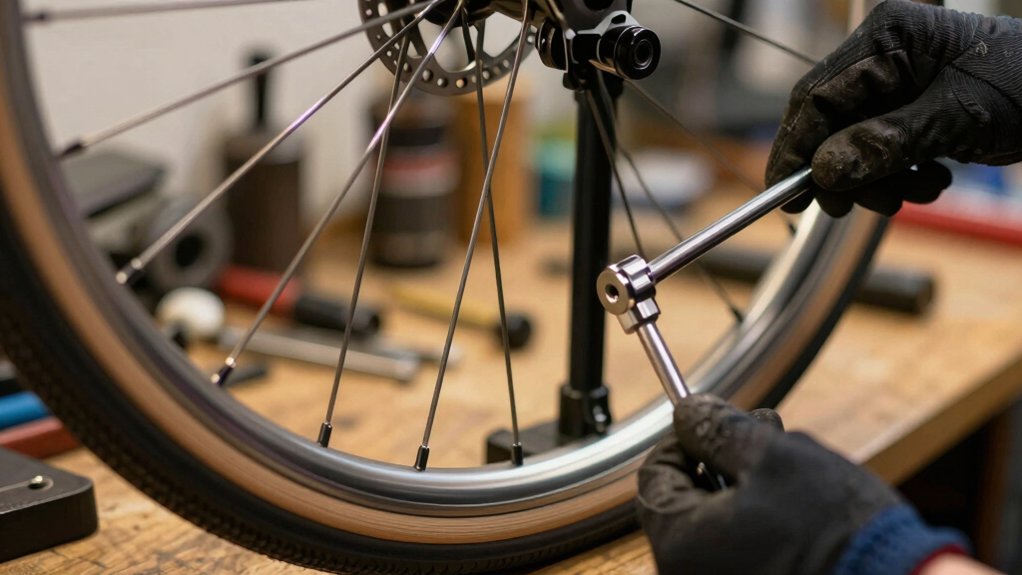
Check brake-track alignment so pads meet squarely, and the wheel sits centered in the frame. Use a tension meter to measure spokes in a consistent pattern. Record left/right differences, and make iterative adjustments. Keep going for step-by-step technique and examples.
Quick Overview
- Aim for lateral runout around 0.2–0.5 mm for pro-level truing; acceptable range 0.2–2.0 mm depending on use.
- Control radial runout to roughly 0.5–1.0 mm for precise wheels; up to 4.0 mm in broader cases, balancing spoke tension.
- Use a tension meter (mechanical or electronic) to measure representative spokes and establish target tension for rim/hub.
- Record spoke position, side, and readings in a consistent sequence to spot unevenness and guide adjustments.
- After truing, check brake-track alignment and wheel centering so pads contact the rim squarely and evenly.
Lateral & Radial Tolerance Chart
When you’re truing a wheel, aim for tolerances that match the job: pro-level work targets about 0.2–0.5 mm lateral and 0.5 mm radial. Everyday rim-brake wheels can be fine at ~0.5–2 mm, and disc wheels tolerate even more. You’ll pick targets from standards (Musson, BS, BikeRadar) and practical ranges. Tighter lateral control matters for rim brakes; disc systems accept more.
Don’t buy into wheelbuilding myths that insist absurdly tight numbers for every build. Balance radial runout against spoke-tension variance and work iteratively.
| Target Type | Typical Range |
|---|---|
| Lateral | 0.2–2.0 mm |
| Radial | 0.5–4.0 mm |
| Dish/tolerance note | Check doubled gauge reading; watch rimcorrosion risks. |
Brake-Track Alignment Checklist
After you’ve set lateral and radial runout to appropriate tolerances, check the brake track alignment so your pads meet the rim squarely and consistently. You’ll catch brake track misalignment by sight and feel: spin the wheel, sight along the pad faces, and squeeze the brake to confirm contact starts and stops evenly. If the rim drifts toward one pad under load, note spoke groups to adjust; don’t touch tension measurement here.
- Verify rim faces are parallel to pad surfaces from multiple angles.
- Look for uneven wear or cupped spots that indicate localized contact.
- Confirm wheel sits centered in the frame. A small offset can mimic misalignment.
If hub endplay exists, address cup and cone adjustment before finalizing pad alignment.
Spoke Tension Measurement Procedure
You’ll start by picking the right tension meter for your spoke type and budget. Then, learn to read its scale reliably. Measure a representative set of spokes evenly around the wheel, record each reading, and compare across left/right and drive/non-drive sides.
Interpret the numbers to spot low or uneven tension. Use that data to guide your truing adjustments.
Choosing A Tension Meter
Why pick a tension meter? You want consistent, measurable tension when truing, not guesswork. Choosing a tension tool hinges on accuracy, repeatability, and ease of use: that’s choosing a tension meter comparison in practice.
Mechanical gauges (torque-style) are robust and cheap; they give usable relative readings but need calibration for different spokes. Electronic meters read frequency and convert to tension; they’re faster and more repeatable across spokes and wheels but cost more.
Consider your work. Hobbyist wheels can use a simple mechanical meter. Pro work benefits from an electronic unit. Check spoke compatibility (steel, stainless, aero), range, and whether the meter stores reference tables. Buy from a reputable brand, and verify calibration periodically so your tension targets stay reliable.
Reading The Tension Scale
How do you read a tension scale so your wheel gets consistent, usable tension? Start by seating the meter properly on the spoke and note the factory or target value for your rim/hub combo.
Take a single reading, then read adjacent spokes to confirm spoke rhythm: tension should step predictably around the wheel, not jump. Record values and compare left/right sides for tension stability; small, consistent differences are normal, but big mismatches aren’t.
Don’t chase a single number; aim for an even pattern and the manufacturer’s tension range. When you adjust a nipple, remeasure nearby spokes to see the local effect.
Work methodically, logging changes. Stop when the scale shows uniformity and the wheel behaves under a light manual flex.
Measuring Multiple Spokes Evenly
Now that you know How to read a tension meter and verify spoke rhythm, measure spokes in a consistent pattern so readings reflect the wheel’s true balance, not random variation. Start at a reference spoke (mark it) and follow a repeatable sequence: every Nth spoke (commonly every 4th) or moving clockwise one spoke at a time, whatever gives measuring consistency across the rim. Record values for each measured spoke and note side (drive/non-drive) to map tension distribution.
Keep the meter orientation and contact point identical for every reading. Do not hunt for outliers mid-run; finish the sequence. Then address trends. This method reduces measurement noise, reveals real high/low bands, and guides targeted adjustments without guesswork.
Interpreting Tension Numbers
Start by comparing your readings to the wheel’s target tension and to each other so you can spot real imbalances, not meter noise. When interpreting tension, treat the meter as a guide: look for consistent patterns across adjacent spokes rather than fixating on single outliers.
Use tension measurement to identify low bands, high clusters, and gradual gradients that cause dish or lateral pull. Remember rims respond over several spokes; a local high reading might be caused by neighboring loose spokes.
Don’t chase meter precision; correct in sensible increments and re-measure. If you see wide variance across one side, suspect build or damage. Logically prioritize groups over singles: equalizing groups yields stable trues faster than perfecting every spoke to an exact digit.
Recording And Comparing Readings
A simple, consistent logging method makes it easy to spot patterns and prioritize fixes, so you’ll want to record each spoke’s tension, its position, and any notes (e.g., damaged nipple, replaced spoke). Use a diagram or numbered list tied to the hub flange and note measured values from your tension meter. Record the reading format you used (kgf, N, frequency) so comparisons stay valid.
When comparing readings, look for clusters, outliers, and alternating high/low patterns that indicate build issues or a broken spoke’s effect. Compare opposing and neighboring spokes, not just absolute numbers, to judge balance.
Keep dated logs—after rides or impacts—so you can track drift and know whether to true, re-tension, or replace components.
Frequently Asked Questions
How Do I Tell if a Spoke Is About to Break?
You’ll spot an imminent spoke break by feeling or seeing spoke fatigue: creaks, softening tension, or visible rust cracks at the bend. Tap spokes and compare pitch; a much lower or dead note signals fatigue.
Look for rim deformation near that spoke: small bumps or lateral wobble concentrate stress. If a spoke feels much looser than neighbors or shows frayed strands, replace it before it snaps.
Can I True a Wheel Without Removing the Tire?
Yes, you can true a wheel without wheel removal if you have sufficient tire clearance and can access nipples. You’ll work on the bike or truing stand with the tire mounted, using a zip-tie or caliper for reference.
Be careful: brakes, limited clearance, and rim tape can block access and hide damage. For big corrections or tight clearances, it’s smarter to remove the wheel to avoid harming the tire or brakes.
When Often Should I Re-Check Wheel Trueness?
Check trueness every 100–200 miles or monthly, whichever comes first. You’ll want to re-check after impacts, heavy rides, or wheel service.
Use two word checks like “spin test” and “bounce check” during quick stops. For deeper discussion ideas, log tension readings and note patterns. Regular wheel maintenance keeps rims reliable; don’t ignore small wobbles: they’re easier to fix early than after they worsen.
Is It Safe to Ride With a Slightly Out-Of-True Wheel?
Yes, you can usually ride with a slightly out-of-true wheel, but don’t ignore it. You’ll feel wobble, hear unusual noises, and risk uneven spoke tension that worsens fatigue or breaks spokes. Ride gently to a safe spot. Check for major rub on brakes or rim, and tighten loose nipples or adjust at home or shop soon.
If braking or handling’s affected, stop and repair before riding further.
Can I True Aluminum and Carbon Rims the Same Way?
Yes, you’ll treat them differently. Aluminum and carbon rim material differences matter: aluminum tolerates nipple turns and rim-bed sanding. Carbon resists heat and flex; therefore, you’ll avoid aggressive tension changes and never file or sand braking surfaces.
Tool compatibility is crucial: use appropriate spoke wrenches, a truing stand, and a torque-aware approach for carbon or limit wrench turns. Work slowly, check tension often, and follow manufacturer limits to avoid damage.
Conclusion
You’ve got the tools and checklist to true wheels accurately: check lateral and radial tolerances, align the brake track, and measure spoke tension methodically. Use a calibrated tension meter, read the scale correctly, and sample spokes evenly across the wheel.
Record each reading and compare against target values to spot weak spots or imbalances. With regular measurement and adjustment, you’ll keep wheels straight, strong, and safe; no guesswork, just repeatable results.
Related: How to