Common Cleat Setup Mistakes
You’re probably costing power and comfort by misaligning cleats, using the wrong pedal/cleat brand mix, or skipping torque and shim checks. Low float suits sprinting and control; higher float gives forgiveness for gravel or joint issues.
Verify bolt patterns, shim thickness, and stack height so the cleat fully engages without rocking. Use a calibrated torque wrench and re-torque after initial rides.
Make progressive adjustments across rides to track pain and stability. Keep going to learn practical fixes.
Quick Overview
- Mount cleats in the wrong bolt pattern or with incorrect hardware, causing poor engagement or unsafe release.
- Ignoring manufacturer torque specs and not re-torquing after initial rides leads to loose or stripped bolts.
- Setting too much or too little float without testing causes knee pain or compromised control.
- Using mismatched pedal and cleat brands or incorrect shims alters release characteristics and accelerates wear.
- Failing to check stack height and shim thickness creates rocking, incomplete engagement, or premature failure.
Cleat Float Range Chart
Wondering which cleat float suits you best? You’ll match float to riding style and anatomy, not styling misconceptions or marketing hype. Use neutral positioning in the middle of your chosen float range to reduce joint stress. Tweak incrementally or get a professional fit.
| Float Category | Degrees | Best Use |
|---|---|---|
| Zero | 0° | XC racing, sprinting |
| Low | 1–3° | Road, fitness |
| Medium | 4–6° | Recreational, long distance |
| High | 7–15° | Gravel, casual, joint issues |
Choose lower float for power and control. Choose medium for balanced comfort and efficiency. Choose high for forgiveness and mobility. Try progressive adjustments across rides; small changes reveal whether you’ve reduced pain or introduced instability.
Torque Values & Limits
Torque Values & Limits
How tightly should you torque cleat fasteners to balance security and hardware longevity? You’ll aim for specified torque ranges, not maximum brute force; that’s where torque safety matters. Over-torquing crushes backing plates and under-torquing lets fasteners loosen under cyclic loads. Use a calibrated torque wrench, follow manufacturer specs, and re-torque after initial settling. Include load testing to verify installation integrity.
- Verify manufacturer torque spec before installation.
- Use marine-grade bolts with Nylock or locking hardware.
- Torque in progressive, crisscross patterns to distribute load.
- Recheck torque after the first few uses and seasonal exposure.
- Document torque values and load testing results for maintenance records.
Consistent torque control prevents failures and extends component life.
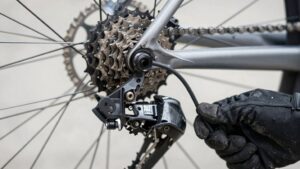
Pedal-Specific Cleat Compatibility
Check pedal and cleat brands for exact compatibility before you bolt anything down, since mismatched bolt patterns and cleat profiles are the most common fit failures. Verify shim thickness and rotational float limits so your cleat sits square and the float range matches your riding style.
If the pattern or profile doesn’t match, don’t force it. Use correct shims or the proper brand-specific mounting plate to avoid premature failure.
Pedal Brand Matching
Why does pedal-cleat compatibility matter? You’ll want to match pedal brand to cleat compatibility so engagement is reliable and wear is predictable. Different manufacturers use distinct retention profiles, spring tensions, and float clearances. Mixing brands can produce poor release characteristics or rapid hardware wear.
Check manufacturer specs for compatible cleat models, tolerances, and recommended replacement intervals. When you retrofit, verify spindle geometry and retention spring alignment to avoid asymmetric loading that accelerates failure. Use only approved cleats or manufacturer-specified equivalents to keep warranty and safety margins intact. If you’re unsure, contact the pedal brand technical support or an experienced fitter.
Correct matching reduces surprises, improves release consistency, and extends component life.
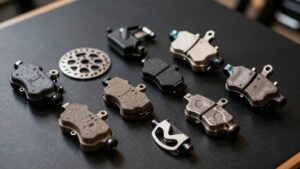
Bolt Pattern Differences
When fitting pedal-specific cleats, you’ll need to verify bolt patterns precisely because mismatched hole spacing or thread sizes prevent secure mounting and can void warranties. You should confirm whether the pedal uses a 3-bolt, 4-bolt, or proprietary layout. Measure center-to-center distances and check thread pitch to avoid ill-fitting hardware.
Use marine-grade bolts that fully engage backing plates; partial engagement concentrates load on fasteners and deck material. Also, verify cleat orientation so the pedal’s float range isn’t constrained by misaligned holes or interference with adjacent fittings. If the bolt pattern differs, don’t force-fit or modify without engineering review. Relocate the mounting or use a correct adapter plate.
Correct pattern matching preserves function, safety, and warranty coverage.
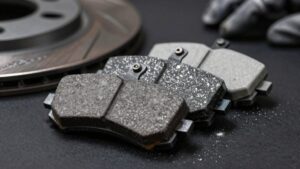
Cleat Profile Fit
After confirming bolt patterns, you must verify the cleat’s profile matches the pedal’s contour and travel envelope, so the cleat won’t rub, bind, or limit float. Inspect mating faces: low-profile cleats may contact raised pedal chambers, while deep-ride designs can foul rotation.
Measure float range and ensure the cleat geometry clears full pedal articulation. Check material finishes; a different coating can change tolerances and introduce grit that alters engagement. Factor that into tolerances and maintenance.
Test-fit before final torque and plan installation timing to avoid rushed errors that hide fit problems. If you find interference, choose a cleat whose cam radius and thickness align with pedal kinematics or adjust pedal shims only when compatible with the pedal’s intended travel.
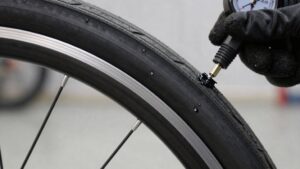
Shim Compatibility Issues
How does a shim change the way a cleat sits against a pedal? You alter contact geometry, and that can fix mismatches between pedal and cleat profile fit or introduce new problems.
Check shim compatibility with the pedal’s mounting surface, thickness tolerances, and materials: soft shims compress, hard shims shift alignment. Measure stack height so the cleat engages fully without rocking or binding. Use shims that maintain bolt clamp preload; too-thick shims reduce thread engagement, and too-thin ones don’t correct angle errors.
Verify that the cleat profile fit remains consistent across the engagement area to avoid uneven wear or unexpected release. Test under realistic load and motion. If alignment still fails, redesign the interface rather than forcing an incompatible shim.
Rotational Float Limits
Why does rotational float matter for pedal-specific cleat compatibility? You need the right rotational float so your cleat and pedal interface allows natural ankle movement without compromising engagement. Too little float forces awkward angles, concentrates stress on small areas, and alters load distribution across the cleat-pedal contact.
Too much float reduces positional control and can let the cleat slip during power strokes. Inspect pedal-specific cleat limits from the manufacturer and match cleat models precisely. Adjust float in small increments and test under realistic load to confirm secure release and comfortable rotation.
Prioritize even load distribution with properly tightened fasteners and backing plates to prevent localized failure. Train to the chosen float setting so you exploit control while minimizing mechanical and physiological risk.
Frequently Asked Questions
How Often Should Cleat Fasteners Be Inspected for Corrosion?
Inspect fasteners for corrosion at least every three months, and after storms or heavy use. You’ll keep inspecting fasteners during routine maintenance, using corrosion monitoring, checking backing plates retrofit integrity, and verifying deck cleats for looseness.
Prioritize high wind mooring periods; apply deck sealants and protective coatings, and confirm safe cleat design to reduce finger entrapment and support belaying safety. Replace corroded hardware immediately to maintain strength and reliability.
Can I Retrofit Backing Plates to an Existing Deck?
Yes, you can retrofit backing plates to an existing deck, but check retrofit limitations first. You’ll assess backing plate compatibility with deck thickness, core material, and access beneath the deck.
Remove old fasteners, bed a correctly sized plate with marine sealant, and use through-bolts and Nylock nuts. Reinforce or replace soft cores if needed. Follow torque specs and test loads; doing this correctly upgrades strength and prevents pull-out failures.
Which Cleat Type Is Safest for High-Wind Mooring?
For high-wind mooring, you’ll want heavy-duty horn or fold-down cleats sized for your line and vessel. However, cam cleats can work for quick releases if rated appropriately.
Prioritize cleat materials like 316 stainless steel and marine-grade bolts with backing plates. Consider wind loading considerations: orient for expected load direction, use oversized cleats, and ensure through-bolting with Nylock nuts.
Inspect and test under load so you’re confident in performance.
How Do I Prevent Finger Entrapment When Belaying Lines?
Use proper belaying safety: Keep fingers clear of the horn and never tuck them under loaded turns. You’ll use controlled wraps (three turns foundation) and finish with a cleat hitch loop that leaves quick-release access.
Position your hand above the line so it pulls away, not into, the cleat. Wear gloves, keep cleats reachable, and practice releases under light load. These finger entrapment preventions reduce injury risk and speed safe release.
What Sealant Protects Deck Around Cleat Installations?
Use a marine-grade 4200 or 5200 polyurethane sealant to protect the deck around cleat installations. For sealant selection, pick 316-compatible, flexible products rated for saltwater and structural bedding.
During deck prep, clean, sand, and dry the area; apply primer if required. Bed the cleat with a continuous bead and torque bolts through backing plates. You’ll create a watertight, load-bearing joint that resists vibration and corrosion.
Conclusion
You’ve now got the core checks to avoid common cleat-setup mistakes: match cleat profiles and bolt patterns to pedals and brands; respect torque specs and shim limits; and set float and rotational limits within recommended ranges.
Double-check compatibility charts and use the right hardware to prevent premature wear or injury. Make adjustments incrementally, test ride, and re-torque. Stay methodical: small, precise setup changes give better power transfer, comfort, and injury prevention.