How to Set up a Bike Trainer Correctly
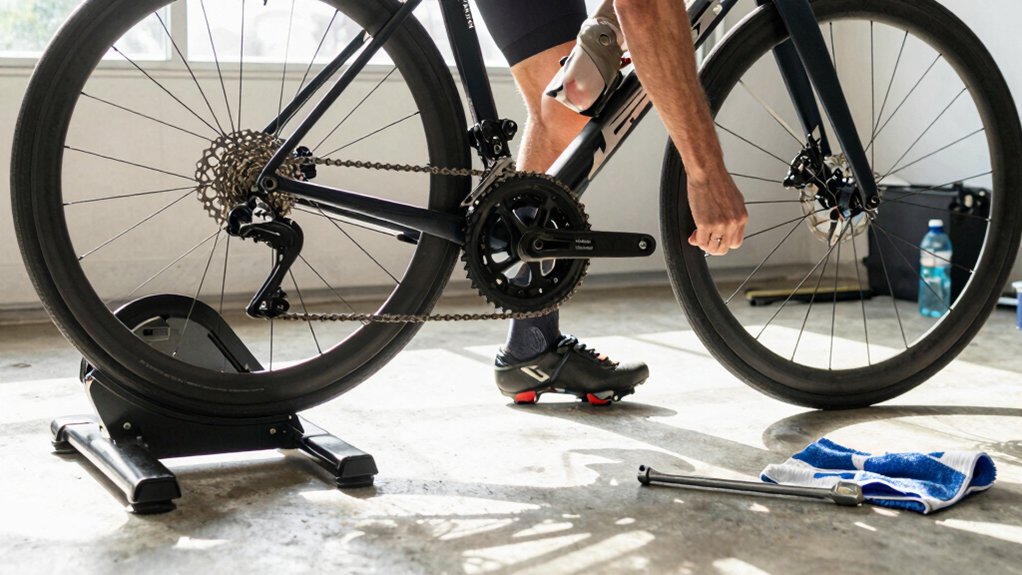
You’ll match your bike’s axle type and spacing, use the correct trainer skewer or thru‑axle adapter, and seat it tight and centered so there’s no side‑to‑side play.
Set roller height so it contacts the tire squarely; some trainers prefer the roller ~1 cm back. Then adjust tire pressure to the trainer’s max‑rated psi and fine‑tune for grip without excess drag.
Torque adapters to spec, inspect fittings, and recheck stability before you ride. Keep going to learn setup tips and safety checks.
Quick Overview
- Confirm whether your bike uses a 9mm quick-release or a thru-axle (e.g., 12x142mm) and fit the correct trainer skewer or adaptor.
- Install the bike securely, torque adaptor/skewer to manufacturer specs, and verify there is no lateral play or misalignment.
- Match trainer roller position to the tire (center or ~1cm behind). Then adjust roller distance for firm, even contact without excess pressure.
- Set front and rear heights so the bike is level using a front-wheel block. Confirm chainline and saddle position match outdoor setup.
- Inflate to the trainer- or trainer-tire recommended PSI. Start low and increase incrementally while monitoring grip, heat, and noise.
Wheelbase & Axle Spacing
Wondering whether your bike will sit true on the trainer? You’ll check wheelbase considerations and axle spacing first: identify QR (9mm) or thru-axle (12x142mm) and pick the correct trainer skewer or adapter. Measure axle length and thread pitch for odd standards; then fit the trainer-specific axle. Set trainer height to match front-rear axle heights and use a front-wheel block for level posture.
Confirm roller position (center or ~1cm behind for some rollers) and adjust roller distance for secure contact without excess pressure.
| Variant | Required Input | Outcome |
|---|---|---|
| QR (9mm) | Trainer QR skewer | Secure clamp, easy swap |
| 12x142mm | Thru-axle adapter (M12x1.5) | Straight, aligned drivetrain |
| Wheelbase/Height | Front block, trainer legs | Level, stable ride |
Max Tire Pressure Limits
Because overinflation can make your tire slip or burst under trainer load, always respect the tire and trainer pressure limits: use a trainer-specific tire rated for the pressures you plan to run and never exceed the maximum psi printed on the tire sidewall or the trainer manufacturer’s guidance. You should match tire pressure to trainer compatibility; aiming for a firm but slightly compliant contact patch. Check both tire and trainer documentation before each session.
- Start at manufacturer-recommended psi; then increase incrementally while monitoring roller grip and noise.
- Use a calibrated gauge; small errors matter when torque and heat rise on the trainer.
- If you see bulging, blows, or repeated slip, reduce pressure and re-evaluate tire type and trainer compatibility immediately.
Skewer Vs Thru-Axle Compatibility
You’ll need to check whether your bike uses a standard skewer or a thru-axle and choose the correct adapter kit accordingly. Measure axle diameter and frame spacing. Fit the trainer’s thru-axle or skewer adapter, and confirm the kit matches your frame’s specs.
Tighten to the recommended torque and re-check stability and alignment before you ride.
Skewer Adapter Options
When switching between wheel-on and direct-drive trainers, pick the correct skewer or thru-axle adapter so your bike mounts securely and your drivetrain stays aligned. Check skewer compatibility with your trainer: many wheel-on units require a hardened trainer skewer to resist clamping forces and prevent slippage. For direct-drive, confirm axle adapters match your bike’s axle width and thread pitch so the frame seats squarely.
Use manufacturer-supplied axle adapters whenever possible; they’ll preserve alignment and protect dropouts. Inspect threads and seals, torque to specified values, and test engagement before riding. If you switch bikes often, keep a labeled kit with spare skewer and axle adapters for quick swaps.
Do this right and you’ll ride confidently, avoid damage, and maintain consistent drivetrain performance.
Thru-Axle Frame Fit
How do you know whether your bike will seat properly on a trainer? Check if your frame uses a skewer or a thru-axle and match the trainer adaptor accordingly. If you have a thru-axle frame, do not assume standard skewers will work. Trainers require specific thru-axle compatibility to lock the bike safely.
Inspect dropout threads and axle type. Confirm whether the trainer vendor supplies adapters for your axle standard and fit the correct adaptor before mounting. You will want a rigid, centered connection so cadence and power transfer stay accurate. Install the adaptor per instructions, torque to spec, and verify there is no side-to-side play.
Proper thru-axle fit prevents damage and keeps your sessions efficient. Consult axle diameter measurements references if unsure.
Axle Diameter Measurements
Now that you’ve confirmed whether your bike uses a skewer or a thru-axle and checked adapter availability, measure axle diameters to ensure a secure fit. Use a caliper to record the nominal axle diameter and the dropout opening; common values are 9mm for skewers and 12mm, 15mm, or 12×142/148mm profiles for thru-axles. Mark both diameter and thread pitch when present.
Prioritize measurement accuracy. Small errors translate to poor seating or damage. Measure twice, note tolerances, and compare to trainer specifications. If your trainer lists acceptable axle diameter range or requires adapters, match precisely. You’ll avoid play, binding, or unsafe mounts by verifying dimensions before attempting installation. A correct fit keeps you confident and riding efficiently.
Trainer Thru-Axle Kits
Why choose a thru-axle kit over a skewer adaptor? You’ll get stiffer, more repeatable alignment and reduced frame stress when you use a purpose-built thru-axle kit.
Check thru axle compatibility with your trainer and bike: axle diameter, thread pitch, and overall length must match. Measure dropouts and compare specs before ordering.
Thru-axle kits often include hardened end caps and a captive interface that eliminates lateral play common with skewers. Review adapter options if your trainer supports both systems; choose kits that list exact measurements and material specs.
Install the kit per trainer instructions. Confirm engagement without forcing parts, and verify drivetrain alignment on the trainer cassette. Proper selection improves power transfer and confidence during intense efforts.
Safety And Torque
Having picked the right thru-axle kit, you still need to treat skewer and thru-axle systems differently when it comes to safety and torque. You’ll follow distinct engagement and torque procedures: quick-release skewers rely on clamp tension and cam action; thru-axles provide axial preload and shear stability. Use the trainer’s specified safety torque values for thru-axles and the recommended skewer clamp pressure—don’t guess.
Over-tightening risks thread damage or warped frames; under-tightening risks wheel slip. Check maintenance torque after initial rides and again periodically. Record values and inspect threads, endcaps, and interfaces. When swapping between wheel-on and direct-drive setups, verify adaptor seating and retorque to spec. Treat torque as safety-critical: precise, repeatable, and part of routine maintenance.
Frequently Asked Questions
How Do I Reduce Trainer Noise Beyond Changing the Tire?
Use a mat, front-wheel riser, and tighten all mounts to stop vibration transmission; you’ll notice noise drops immediately. Balance your pedal stroke efficiency to avoid sudden torque spikes that amplify sound.
Check roller alignment and replace worn bearings; lubricate moving parts per manufacturer specs. Position a fan and open windows as part of an indoor ventilation strategy to move sound and heat away. Record changes and iterate for quieter sessions.
Can I Use Indoor-Specific Cycling Shoes on Any Trainer?
Yes, you can use indoor cycling trainer shoes on most trainers, but check compatibility first. Indoor cycling shoes and trainer shoes usually share SPD, Look Delta, or SPD-SL cleats; confirm your trainer’s pedal or adapter type.
Use the correct cleat system, tighten cleats to spec, and ensure secure engagement to avoid slips. You’ll get better power transfer and comfort. Don’t forget to test engagement and adjust tension before intense sessions.
How Often Should I Service the Trainer Bearings?
Service trainer bearings every 6–12 months depending on use: monthly if you ride intensely or daily; yearly for light use.
Regular bearing lubrication cuts friction and extends life, improving performance and noise reduction. Inspect seals and spin the unit monthly. Re-grease or replace bearings at first roughness, grind, or persistent noise.
Keep records of service intervals, and do not ignore small changes. Timely maintenance keeps your trainer reliable and fast.
Is It Safe to Ride Barefoot on a Trainer?
Is it safe? Generally no, barefoot riding on a trainer raises injury and equipment risks. You’ll lose pedal control, increase slippage, and expose feet to crush or abrasion from pedals, rollers, or moving parts.
Use proper cycling shoes or at least stiff-soled shoes with good grip. That gives consistent power transfer, reduces hotspots, protects skin, and keeps you safer and more efficient during indoor sessions.
Can I Connect Multiple Devices to Trainer Ant+/Bluetooth?
Yes, you can connect multiple devices via ANT+ and Bluetooth, but check connection alternatives and compatibility questions first. Most trainers broadcast on both protocols. You’ll pair a single app or head unit per protocol or use ANT+ FE-C for simultaneous control.
If you need dual connections (trainer plus power meter plus HR), prioritize ANT+ for multiple concurrent links and Bluetooth for single-device phone apps. Test combos to avoid dropouts.
Conclusion
You’ve covered the key fit and safety checks: confirm wheelbase and axle spacing, respect max tire pressure, choose the right skewer or thru-axle adapters, and verify axle diameters and frame fit against the trainer’s thru-axle kit. Measure precisely; torque hardware to spec, and inspect contact points before each session.
Do the prep once and ride confidently. Proper setup keeps you stable, protects your bike, and lets you focus on training gains without mechanical distractions.
Related: How to Start Indoor Cycling Training