How to Set Saddle Height Correctly

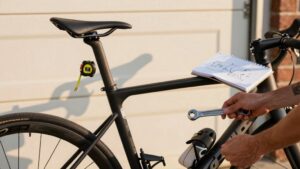
Start with your inseam: multiply by ~0.883 (BB to saddle) or 1.09 (pedal axle to saddle) for a baseline. Then fine-tune so your knee has about 25–35° flexion at the 6 o’clock pedal position.
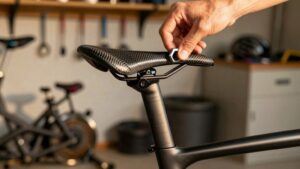
Adjust saddle fore-aft afterward to balance knee tracking and power. Tighten the seatpost/saddle clamp with a calibrated torque wrench to the manufacturer’s spec; recheck after a short ride. Continue for step-by-step setup and safety notes.
Quick Overview
- Use your inseam with a proven formula (LeMond: inseam × 0.883 from BB to saddle top) as a starting saddle height.
- With pedal at 6 o’clock, aim for ~25–35° knee bend (about 145° inner knee angle) and adjust 2 mm increments.
- Check fore-aft saddle position and pedal/puck stack after height changes to preserve knee-over-pedal alignment.
- After final position, tighten seatpost and clamp bolts to manufacturer torque specs using a calibrated torque wrench.
- Reassess comfort and pedaling on a short ride. Re-torque fasteners and tweak for foot size, crank length, and flexibility.
Leg Length vs Saddle Height
How does your inseam determine where the saddle should sit? You use inseam-based formulas as precise starting points: multiply inseam by a coefficient (LeMond 0.883, Hamley ~1.09) to set saddle height from the BB or pedal surface. That initial height predicts knee bend at bottom stroke and guides torque tightening of the seatpost clamp during incremental adjustments.
Expect corrections for crank length, foot size, flexibility, and fore/aft saddle position.
| Method | Formula | Reference |
|---|---|---|
| LeMond | Inseam × 0.883 | BB center → saddle top |
| Hamley | Inseam × 1.09 | Pedal surface → saddle top |
| Loughborough | ≈ Inseam × 1.09 | Evidence-based standard |
.5° Knee Bend Guideline
Why does knee bend matter so much? You need a controlled knee angle at the bottom of the stroke to optimize power, reduce strain, and avoid injury. Don’t treat this as an irrelevant topic or an unrelated concept: it directly affects force vectors and joint loading.
Aim for about 25–35° flexion at the outer knee or ~145° inner knee angle. Use a goniometer or video to measure knee angle with crank at 6 o’clock. If the knee is over-flexed, raise the saddle in 2mm increments; retest. If the knee is too extended, lower the saddle similarly and reassess cadence and comfort.
Check shoe/pedal stack and fore-aft saddle position since they alter effective knee bend. Validate with steady efforts and tweak until pedaling feels smooth and efficient.
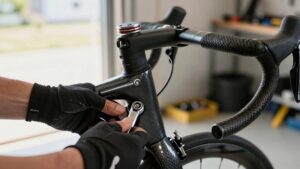
Torque Wrench Tightening Specs
When you finish setting saddle height, you must tighten clamps to specified torques by material: aluminum, carbon, and steel all have different limits to prevent slippage or damage. Follow a correct torque sequence (gradual, alternating increments) and use a calibrated torque wrench set to the recommended range for your clamp and rail type.
Never exceed manufacturer values. Check your wrench calibration periodically and retorque after a short test ride to avoid overtightening or component failure.
Torque Specs By Material
Which torque value you set when tightening a saddle clamp or seatpost bolt depends on the materials and fastener type. You should always use a calibrated torque wrench and follow manufacturer specs to prevent damage or slippage.
For steel bolts into steel clamps, 8–12 Nm is typical; for alloy bolts into alloy clamps, 5–8 Nm; for titanium hardware, stay at the low end, 4–6 Nm. Carbon components demand the most care: use carbon-specific clamps, carbon paste, and torque 3–5 Nm unless the maker specifies otherwise.
Stainless fasteners often tolerate slightly higher values, but follow part ratings. Correct torquing preserves torque aesthetics and saddle ergonomics by preventing micro-slip, crushing, or uneven clamp pressure. Re-torque after initial rides.
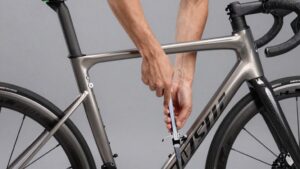
Correct Torque Sequence
How should you approach tightening a saddle clamp to get consistent clamp pressure and avoid damage? Use a controlled torque sequence: set your torque wrench to the lower end of the specified range, preload bolts in alternating steps, then finish to spec.
For two-bolt clamps, finger-tighten both; torque to 50% of target on one bolt, then the other; and alternate to final torque. For four-bolt rails, follow a crisscross pattern (diagonal pairs) in incremental steps.
This subtopic relevance lies in preventing rail deformation and seatpost slippage while achieving reproducible clamp pressure. Record final torque values and bolt order for future checks.
Don’t overtighten. If components deform before reaching spec, stop and reassess hardware compatibility or lubrication.
Torque Wrench Calibration
Why does your torque wrench need calibration before you rely on its settings? You must confirm accuracy: mechanical and electronic wrenches drift with use, temperature, and storage. Calibrate annually or after impact; check against a certified tester or send to a lab. Before adjusting saddle clamps or rails, verify the tool reads true at common targets.
Record pre- and post-calibration readings and note environmental conditions. When working to published torque specs by material, use a calibrated wrench to avoid under- or over-tightening soft alloys, carbon, or titanium. Match the wrench type (click, beam, or digital) to the required precision and range.
If you can’t calibrate immediately, use a calibrated torque screwdriver for low-value fasteners and postpone critical carbon-bolt torques until verified.
Recommended Torque Ranges
Once you’ve confirmed your torque wrench is reading accurately, pick the correct tightening specs for each fastener and follow them precisely. For seatpost clamp bolts, 5–8 Nm is typical; for rail clamps on modern carbon saddles, 6–8 Nm; for alloy rails and older clamps, 7–10 Nm.
Use manufacturer data for saddle rails, clamps, and micro-adjusters. When in doubt, bias lower and recheck. Apply torque in small increments and re-seat hardware between steps. Note that including “subtopic irrelevance” or launching into unrelated discussion wastes time: stay focused on specified Nm ranges.
Record values in your maintenance log. Torque to spec prevents slippage and damage without overstepping into the next section on avoiding overtightening.
Avoiding Overtightening
Wondering how tight is too tight? You should use a torque wrench to avoid overtightening the seatpost clamp and rail bolts when setting saddle height. Follow manufacturer torque specs; typically low, often 5–8 Nm for carbon components. Tighten incrementally. Overtightening can crush carbon rails, deform alloy clamps, and shift saddle fore-aft position. All of these issues reduce pedaling efficiency and compromise accurate saddle height.
Torque-controlled clamping preserves clamp geometry and repeatable saddle height settings after adjustments. If you lack a wrench, hand-tighten, mark positions, and have a shop verify torque. After tightening, cycle the cranks and recheck saddle alignment and height. Retorque to spec if needed to maintain consistent efficiency and prevent component damage.
Frequently Asked Questions
Should I Change Saddle Height for Different Shoe Types?
Yes, you should adjust saddle height for different shoe types. Stiffer shoes and higher stack heights change effective leg extension; this affects saddle compatibility and knee angles. Measure with shoes on, note heel-toe or LeMond adjustments, then fine-tune in 2mm steps until pedaling feels efficient.
Record settings per shoe so you can restore them. Prioritize consistent pedal contact and avoid excessive knee flex or overextension.
How Often Should I Re-Check Saddle Height?
Check saddle height every 3–6 months and after any major change (shoe type, pedals, saddle, or position). You’ll prevent creeping issues and maintain cadence consistency and correct pivot points.
Re-check sooner if you feel knee pain, loss of power, or uneven wear. Use small 2mm tweaks; test on a steady ride, and note knee angle or heel-toe cues. Keep a log so adjustments stay precise and repeatable.
Can Saddle Height Affect Bike Handling?
Yes, saddle height influences bike handling. You’ll change weight distribution, steering responsiveness and cornering stability when you alter saddle ergonomics and perform height calibration.
Too high shifts weight rearward, reducing front-wheel grip; too low forces more weight forward, increasing twitchiness. Small adjustments (2mm) notably affect balance and pedal clearance. Re-check after equipment or position changes to maintain predictable handling and optimal control.
Will a New Saddle Model Change My Height?
Yes, a new saddle can change your height. Different saddle profiles, padding, and rail geometry alter sit bone contact and effective saddle-to-pedal distance. You should do a product comparison versus your old saddle.
Measure BB-to-saddle and check knee angle; adjust in ~2mm increments until pedaling feels smooth. Re-test seated position after any equipment change (shoes, pedals) to maintain optimal power and avoid discomfort.
Is Saddle Height Different for Triathlon Vs Road Bikes?
Yes, you’ll often set saddle height differently for triathlon versus road bikes. Triathlon saddle geometry and forward aero position shift your hip angle; thus, Bike Fit metrics (inseam-based height, knee angle) need adjustment. Typically, this involves a few millimeters lower and more forward.
Use precise measurements (goniometer, BB-to-saddle), recheck pedaling comfort and power, and fine-tune in small increments after testing in your specific aero setup.
Conclusion
You’ve learned to balance leg length with saddle height. Aim for about a 5° knee bend at bottom dead center. Use a calibrated torque wrench to tighten seatpost and clamp fasteners to manufacturer specs. Follow the correct torque sequence and material-specific ranges to prevent damage.
Regularly check wrench calibration and avoid overtightening; stick to recommended values for aluminum, carbon, and steel components. This protects parts, ensures comfort, and maintains efficient, repeatable power transfer.
Related: Bike Saddle Height Calculator
Related: How to Prevent Knee Pain From
Related: Bike Size Calculator