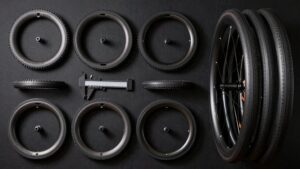
Tubeless Tires Explained
Tubeless Tires ditch inner tubes, so you get fewer flats, lower rolling resistance, and better traction when you run lower pressures. You’ll pick a valve (Presta, Schrader, or high-flow) and match length to rim depth. Fit clean tape, seat the bead in short inflation bursts, add compatible sealant, and snug the removable-core valve nut.
Use a calibrated torque tool and avoid over-tightening to prevent rim or valve damage. Keep going to learn specific sealants, torques, and troubleshooting.
Quick Overview
- Tubeless tires eliminate inner tubes, sealing directly to the rim to reduce flats and allow lower pressures for better traction.
- Choose the proper valve type and length (Presta/Schrader/high-flow) to match rim hole diameter and depth.
- Apply compatible sealant (latex, synthetic, or fiber-rich) based on riding type, particle size needs, and temperature range.
- Seat the bead evenly with clean rim tape; use incremental inflation bursts and listen for consistent clicks before final torque.
- Verify torque with a calibrated tool; avoid overtightening and recheck after initial rides. Inspect for leaks or tape displacement.
Valve Stem Types Comparison
Which valve you pick matters more than you might think when setting up tubeless wheels. You’ll choose based on rim hole sizing and desired valve stem customization: Presta fits 6mm holes, is light, and lets you tweak cores. Schrader needs 8mm, flows faster, and is robust. High-flow variants bridge compromise; they provide better airflow without full Schrader weight.
Match valve length to rim depth (40–80mm common) and prefer removable cores for sealant work. Consider hybrid valves if you want Schrader-like fill in a Presta hole. Below is a simple mental map to guide selection.
| Type | Hole | Strength |
|---|---|---|
| Presta | 6mm | Light, customizable |
| Schrader | 8mm | High flow, sturdy |
| High-flow hybrid | 6–8mm | Fast seating, versatile |
Sealant Compatibility Chart
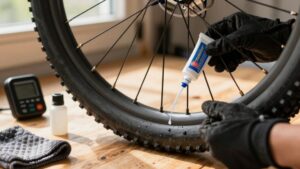
You’ve picked the right valve for your rim. Now match the sealant to the tire and conditions. Use a simple chart approach: list tire type, recommended sealant base, particle size, temperature range, and reapplication interval. Focus on sealant compatibility with bead materials and tubeless-ready casings. Tire sealing chemistry dictates how well latex, polymer, or synthetic blends bond and seal.
- Road/tubular: low-viscosity polymer, fine particles, warm climates
- Gravel/commuter: latex blend, medium particles, broad temp range
- Mountain: synthetic with fibers, larger particles, cold-tolerant
- Heavy-duty/excavation: fiber-rich sealant, large particles, frequent recoat
- Lightweight race: pure latex, ultra-fine particles, short service life
Check manufacturer specs to ensure proper tire sealing chemistry. Avoid incompatibilities.
Bead Seating Torque Specs
When you seat a tubeless bead, follow the proper procedure and use the right torque for your rim to ensure a safe, airtight lock. Check manufacturer torque values; use a calibrated torque tool; and be aware that overtorquing can damage the bead or rim and cause leaks.
After seating, recheck torque to confirm nuts or collars remain within spec.
Proper Bead Seating Procedure
How do you properly seat a tubeless tire bead and get the torque just right on the valve and rim locknuts? You start with correct bead seating: ensure rim tape, valve, and tire bead are clean. Then push the bead into the rim channel all the way round. Inflate in short bursts to pop the bead into the bead seat; listen for consistent clicks.
Add recommended sealant, checking sealant compatibility with your tire and rim materials before pouring. Once seated, snug the tubeless valve nut finger-tight. Then use a torque driver or wrench to apply a light, controlled final turn—enough to compress the base but not crush the valve stem.
Tighten rim locknuts similarly: incremental turns, check for air leaks. Then ride-test and recheck.
Torque Values By Rim
After seating the bead and snugging the valve and rim locknuts finger-tight, you’ll need to apply controlled torque to those fittings to make sure they seal without damaging the valve, rim, or tape. Torque values vary by rim material, valve design, and rim compatibility; consult the rim maker for exact numbers.
Generally, light alloy rims take lower torque than carbon. Over-torquing can crush the valve base or cut tubeless tape. Use small increments and feel for resistance: secure, not rock-solid. If you strip threads or deform the rim bed, back off and inspect tape and valve seating.
Mark the final torque for future reference and recheck after initial rides to confirm the seal remains reliable.
Torque Tools And Calibration
Why does controlled torque matter when seating tubeless beads? You need consistent, measured force to compress the bead evenly against the rim’s seat so the seal forms predictably. Use a calibrated torque wrench or digital torque driver on bead-locking systems and valve nuts; don’t guess by feel.
Calibrate tools regularly against a certified standard or send them for lab calibration to ensure readings stay accurate. Keep a log of calibration dates and target torque ranges from the rim or manufacturer. Treat debates about tool brands as an unrelated topic and avoid confusing discussions about an irrelevant concept like “raw hand strength.”
Proper torque control speeds reliable seating, reduces repeat attempts, and preserves rim and bead integrity without risking next-section issues.
Common Overtightening Risks
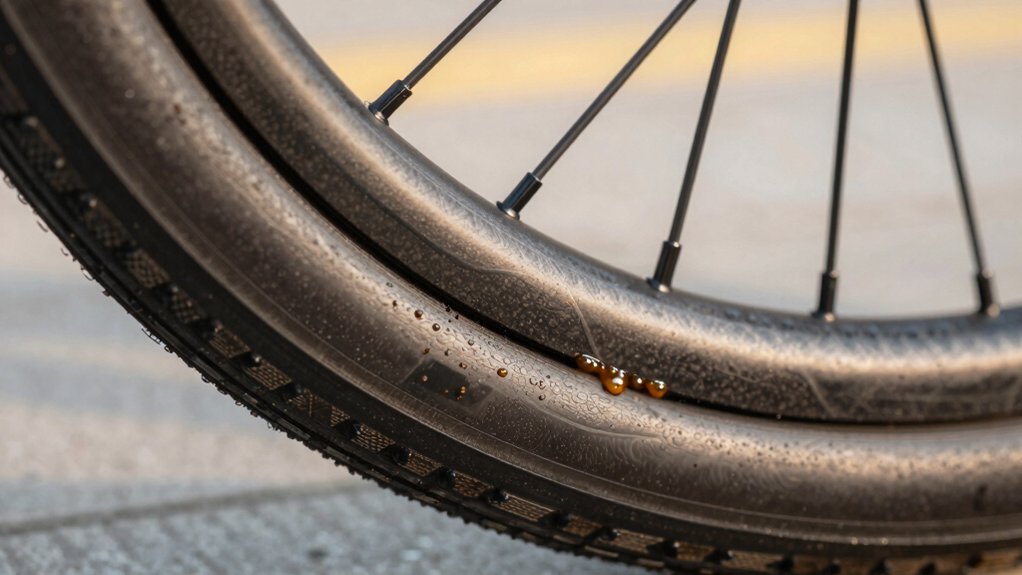
What happens when you over-torque components while seating a tubeless bead? You risk damaging the rim, stripping valve threads, and deforming bead seats. Common overtightening causes tiny cracks in rim material or warps the bead shelf so the tire won’t seal reliably. You can also compress rim tape or push it out of place, creating slow leaks that sealant can’t fix.
Avoid applying excessive torque to valve nuts, tubeless adapters, or bead-seating hardware. Use a calibrated torque wrench and follow manufacturer bead seating torque specs when provided. Treat fasteners gently during inflation bursts. Inspect the rim and tape after seating.
Being measured prevents Tubeless Setup risks and preserves reliable, long-lasting seals.
Post-Seat Torque Check
How should you verify torque once the bead’s seated? You’ll recheck spoke nipples, rim strip fasteners, and valve collar torque after seating because initial inflation can shift loads and change seat clearance.
Use a calibrated torque wrench set to the manufacturer’s bead seating torque spec for valve collars and any removable rim hardware. Inspect the rim profile visually and by feel: the bead should sit evenly in the bed, with consistent clearance at the bead seat.
Tighten incrementally—quarter turns—working opposite sides to avoid distorting the rim profile. After a short test ride, re-measure torque and check for air loss.
Record values for future reference and follow rim and tire maker limits; don’t exceed recommended torque.
Frequently Asked Questions
Can I Run Tubeless Tires Without Rim Tape if Drilled Holes Are Small?
No, you shouldn’t run tubeless without rim tape if your drilled holes are even small. For reliable tubeless compatibility, you need an airtight rim bed. Rim tape viability is what provides that seal over spoke holes.
Small holes still leak sealant and air, risking failure. Use proper tubeless-specific tape, install a tubeless valve, and check the sealant. That ensures safe, durable tubeless performance.
How Long Does Leftover Sealant Remain Effective Inside a Stored Tire?
Typically you’ll find leftover sealant remains effective for about 2–6 months in a stored tire; however, storage stability varies by brand and formulation. You should check it every 2–3 months. Shake the wheel to see if it still sloshes, and top up or replace it if it’s dried, clumpy, or smells bad.
Cooler, dark storage extends life; heat and sunlight shorten it.
Can Tubeless Setup Affect Bike Frame Clearance or Rotor Alignment?
Yes, a tubeless setup can affect frame clearance and rotor alignment. You’ll often run wider tires and different rim profiles, so check clearance around chainstays and fork.
Mounting or seating beads can shift tire position slightly, which may nudge rotor-to-caliper spacing; always re-center your wheel and recheck rotor alignment after installation. If clearance is tight, choose narrower tires or adjust hub spacing or axles to restore proper alignment.
Are Tubeless Tires Compatible With Tire Pressure Monitoring Systems?
Yes, tubeless compatibility with Tire Pressure Monitoring systems is common and straightforward. You can fit most wireless TPMS sensors to tubeless valves or stick sensors inside the tire. Just ensure tubeless compatibility by choosing sensors rated for sealant exposure.
You’ll monitor pressures in real time, catch slow leaks, and track trends. Install sensors per manufacturer instructions, check battery life, and avoid sealant gumming up valve threads for reliable readings.
Can You Patch a Large Gash in a Tubeless Tire Permanently on Trail?
Yes, you can often repair a large gash tubeless on trail temporarily, but permanent patching usually needs workshop tools. For immediate fixes, add sealant, use a tubeless plug or boot, and ride slowly to the nearest shop.
For long-term reliability, replace the tire or professionally glue a patch. Remember to check sealant longevity storage before rides so sealant’s active and won’t fail when you need it most.
Conclusion
You’ve learned the key points for installing and maintaining tubeless tires: pick the right valve stem and sealant, follow bead seating procedure and torque specs for your rim, and use calibrated tools.
Don’t overtighten; check torque after seating and periodically. Doing this prevents leaks, rim damage, and unsafe riding. Follow the compatibility chart and torque values. Recheck fittings after the first ride, and you’ll keep tubeless systems reliable and ready for the road.
Related: How to Set up Tubeless Tires
Related: Bike Maintenance Toolkit Checklist