How to Know When Brake Pads Need Replacing
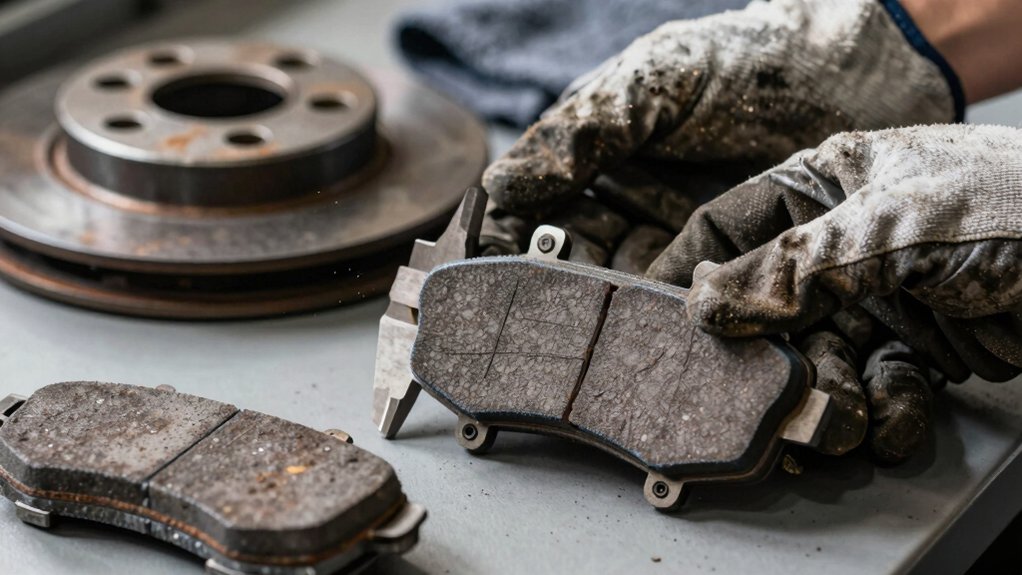
You’ll know pads need replacing by measuring the friction material: new pads are 10–15 mm (OEM ~10–12 mm). You should replace at about 2–4 mm remaining. Listen for the wear‑indicator squeal and inspect for uneven wear or a tab contacting the rotor.
Check rotor thickness at several points against the manufacturer minimum and measure runout. Use a micrometer for final confirmation. Follow these checks to decide replacement. The next section explains exact measurement steps.
Quick Overview
- Measure pad friction thickness through the wheel or off the caliper; replace when it reaches about 2–4 mm. OEM often specifies 2–3 mm.
- Listen for an audible high-pitched squeal from the wheel, which indicates the wear indicator is contacting the rotor.
- Inspect pads for uneven wear or a low corner that can cause premature contact and inconsistent braking.
- Check rotor condition and thickness at multiple points; replace rotor if below manufacturer minimum or if the wear groove is gone.
- Use a caliper for quick checks and a micrometer for final rotor thickness verification and to record runout and taper.
Pad Thickness Comparison Chart
Wondering how much pad material is left and when to act? You’ll use a compact comparison to judge pad thickness against replace limits and OEM variations. Measure friction material only. Note that new pads typically run 10–15 mm, common OEM at 10–12 mm, and some models (BMW, trucks) higher.
| Category | Key Numbers |
|---|---|
| New range | 10–15 mm (common OEM 10–12 mm) |
| Performance/Heavy | 12–16 mm (BMW ~12 mm) |
| Replace guideline | 2–4 mm (many OEMs 2–3 mm) |
Use a ruler via spokes or caliper off-wheel. Remember that city driving shortens life. Any pad at or below its OEM minimum means you should replace the set to avoid rotor damage.
Squeal Indicator Thickness Limits
How close are your pads to the metal wear indicator engaging? You’ll monitor the squeal indicator as a primary warning of low pad material. Know the thickness limits and act before the indicator contacts the rotor to avoid rotor wear. Use simple indicator measurements during inspection and record values.
- Measure pad friction thickness; replace when within 2–3 mm of the indicator base.
- Note audible squeal onset and correlate with measurements to confirm threshold.
Inspect for uneven wear; a single low corner can let the indicator touch the rotor prematurely. If the indicator metal contacts the rotor, expect scoring. Replace pads and assess rotor wear immediately.
Rotor Wear Indicator Measurements
You’ll want to measure rotor thickness at the hat and friction surface with a micrometer or caliper to compare against the manufacturer’s minimum thickness spec. Check wear indicator locations and note runout while measuring. Since lug-runout or warped rotors will affect readings and braking feel, use consistent measurement points and tools.
This way, you can decide if machining or replacement is required.
Rotor Thickness Measurement
Measure rotor thickness with a micrometer or caliper at several points around the rotor to find the minimum thickness and compare it to the manufacturer’s wear limit. If the reading is at or below the spec, or the rotor wear indicator groove is gone, replace the rotor to avoid vibration, reduced braking performance, or caliper/pad damage.
You should record measurements at multiple radial and axial positions to detect scoring, taper, or lateral runout. Prioritize the minimum reading; that’s what dictates serviceability. During the check, perform a caliper inspection: verify piston movement, mounting hardware, and pad contact to correlate rotor wear patterns with caliper function.
If measurements approach the limit or you see uneven wear, resurface only if within tolerance. Otherwise, replace to prevent brake judder and accelerated pad failure.
Minimum Thickness Specs
Rotor minimum thickness specs define the smallest safe rotor depth you must not go below. You should compare your micrometer or caliper readings to the vehicle manufacturer’s wear limit at multiple locations around the rotor. You’ll record measurements at the inner, middle, and outer diameters and note any deviation. Concentric thinning or localized grooving can push a rotor below spec even if average thickness seems acceptable.
Adhere to recommended service intervals when checking rotors, especially if pad durability has been compromised by heavy use. If any measurement equals or falls below the published minimum, replace or resurface per manufacturer guidance. Document readings and date-stamp them to track wear rate and inform future maintenance decisions.
Micrometer Vs Caliper
Wondering whether a micrometer or caliper will give you the most reliable rotor wear readings? You’ll choose based on accuracy needs and access. A micrometer precision measurement excels for small depth differences; use it to quantify rotor thickness at multiple points and compare to minimum spec. Ensure consistent contact and zero calibration before each reading.
A digital caliper alignment is faster for general checks and edge-to-edge measurements; however, it’s more sensitive to jaw placement and operator angle. When using a caliper, verify caliper alignment with the rotor face and repeat measurements to confirm repeatability. For best results, use a micrometer for final pass/fail confirmation and a caliper for quick inspections.
Wear Indicator Location
Where is the wear indicator located on your brake assembly, and how should you read it? The wear indicator is a small metal tab or groove on the pad edge or rotor hat. On many systems, it’s mounted to the pad backing plate so it contacts the rotor when friction material is nearly gone.
Inspect through the wheel or remove the wheel to view the pad face and backing plate. If the tab contacts the rotor or the groove depth is at specified minimum, schedule pad replacement. Use a straight feeler gauge or caliper to verify remaining friction thickness against manufacturer limits.
Don’t rely solely on noise; visual measurement of the wear indicator and pad thickness gives a definitive trigger for pad replacement.
Measuring Runout Effects
How does runout affect your rotor wear readings? You’ll measure radial runout with a dial indicator against the rotor hat while spinning the wheel hub. Small peaks change where the wear indicator contacts the pad, skewing measurements.
Calibrate the indicator, secure the wheel, and note total indicated runout (TIR). If runout exceeds manufacturer spec, expect false positives on wear indicators and uneven pad loading. Discussion ideas should include distinguishing runout effects from pad or caliper issues, checking hub bearings, and verifying rotor trueness after resurfacing.
Use systematic steps: measure TIR, compare to spec, inspect for lateral runout, and re-evaluate wear indicator position. Correcting runout restores reliable rotor wear readings and prevents premature pad replacement.
Frequently Asked Questions
Can Worn Pads Cause Brake Fluid Loss or Leaks?
Yes, worn pads can indirectly cause brake fluid loss or leaks. As pad wear forces pistons farther out, seals can stretch or nick. Calipers may stick, causing fluid to drop or leak. You’ll often hear a brake squeal from pad wear indicators before fluid issues appear.
Inspect pads, calipers, and hoses promptly. Replacing worn pads and repairing damaged seals prevents progressive seal failure and costly rotor or caliper damage.
How Do Driving Habits Affect Pad Lifespan?
Your driving habits directly control pad lifespan. Frequent hard braking and stop-and-go traffic accelerate wear, while smooth, anticipatory braking preserves pads. Aggressive drivers produce uneven wear patterns and hotter pads; this shortens life and risks warped rotors.
Mountainous or heavy-load driving increases friction and heat, reducing mileage. Gentle deceleration, engine braking, and maintaining proper tire and brake system condition extend pad life and promote uniform wear patterns.
Can New Pads Eliminate Pedal Vibration Immediately?
Not always; new pads won’t guarantee immediate vibration elimination if rotors are warped or uneven. You’ll install new pads, but immediate vibration can persist from rotor runout, uneven wear, or caliper issues. Resurfacing or replacing rotors and checking calipers is often required.
After correcting rotor or hardware problems, new pads will stop vibration. Inspect for warped rotors, uneven pad transfer, and hardware binding before expecting immediate vibration-free braking.
Are Brake Pad Materials Noisy by Design?
Yes, some brake pad materials are noisier by design. You’ll encounter noise concerns with semi‑metallic pads because their material composition includes metal fibers that boost performance but create squeal or grinding under certain conditions.
Ceramic pads use denser, nonmetallic compounds and tend to be quieter. Organic pads are softest and often quieter yet wear faster. Choose material composition based on acceptable noise, durability, and braking performance trade‑offs.
Is Professional Inspection Necessary After Six Months?
Yes, you should get a professional inspection at a six month interval. A trained technician checks pad thickness, uneven wear, rotor condition, calipers, brake fluid, and audible indicators that you might miss.
Regular professional inspection catches thin pads before metal-on-metal contact; it prevents rotor damage and verifies braking performance under load. If you notice squeal, grinding, pulling, or a soft pedal sooner, get inspected immediately rather than waiting.
Conclusion
You’ve now got the concrete checks to tell when pads and rotors need replacing: compare pad thickness to the chart, listen for the squeal indicator, measure rotor thickness and runout with a micrometer (calipers are less accurate), and note wear indicator locations.
Replace pads when they hit the minimum spec or the squeal threshold. Replace or machine rotors when they’re below minimum thickness or show excessive runout. Regular measurement prevents failure and maintains safe braking.
Related reading: How to Choose Disc Brake Pads Material — a closer look at this topic.