Bike Storage Tips for Small Spaces
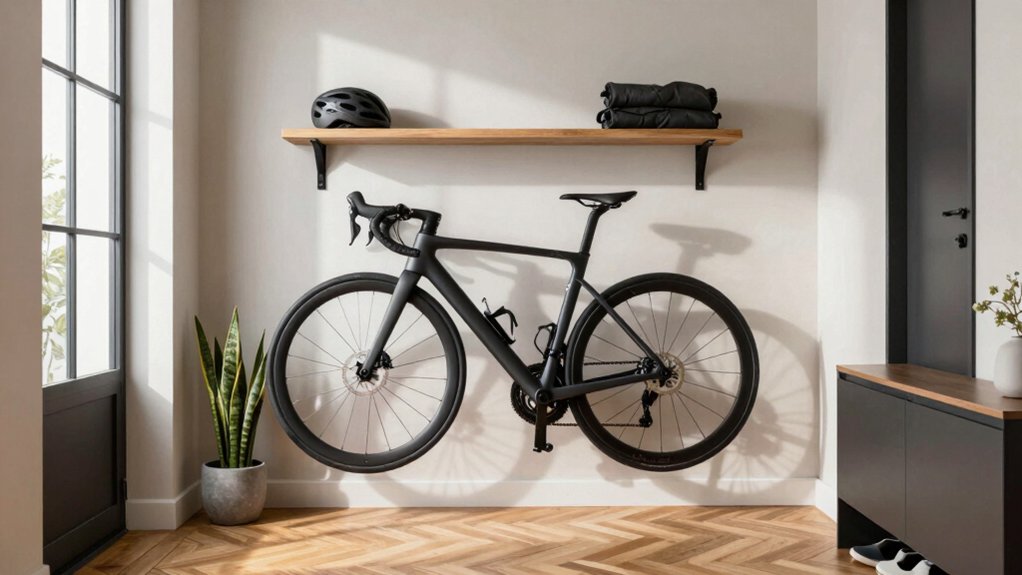
Mount bikes on sturdy, stud-anchored wall racks or a ceiling lift to free floor space. Plan for 42–46″ hang space and a 48″ aisle for easy loading. Stagger hooks 10–24″ apart to fit handlebars and use 11-gauge or reinforced hooks if bikes weigh over 30–50 lb.
Measure from finished floor to the lowest beam and allow 6–12″ for pulley hardware plus 20–30 cm for accessories. Follow these basics and you’ll see simple setup options and layouts.
Quick Overview
- Use vertical wall-mounted racks to free floor space, aligning mounts with studs and allowing 42–46″ hang space for handlebars.
- Choose hooks rated for your bike weight; pair or reinforce hooks for e-bikes or cargo bikes (50–100+ lb).
- Stagger racks vertically (10″ offset) or horizontally (24″ spacing) to prevent handlebar interference.
- Add 6–12″ ceiling clearance or pulley lifts for overhead storage. Measure finished floor to lowest obstruction.
- Account for accessories by leaving a 20–30 cm buffer. Test the bike’s lift path before final installation.
Wall-Mounted Rack Dimensions
Wondering how much room a wall-mounted rack will actually need? You’ll plan by measuring ceiling height (84″–90″ for many units) and available wall space. Then pick a rack design that fits your bike widths and handlebar projection. Allow 42–46″ hang space and a 48″ aisle for loading.
Stagger units at 10″ if you place them 15″ apart, or keep the same height at 24″ spacing. Account for 16″ clearance for road bikes and up to 39″ for wide MTB bars. Use studs on 16″ centers when mounting and prefer 11-gauge steel or 3/8″ wire frames with powder coat or galvanized finishes for durability.
| Model | Length | Height |
|---|---|---|
| WRK-1 | 4″ | 62″ |
| Trac | 66.3″ | — |
Max Load per Hook
How much weight can one hook actually hold? You’ll want to match hook load capacity to your bike type and wall. A typical single metal hook will safely support 20–50 lb when anchored into studs. Heavy e-bikes need 50–100 lb-rated solutions or double hooks. Check manufacturer ratings and consider hook spacing to avoid leverage that rips anchors out.
- Light road bike on stud-mounted hook (20–30 lb)
- Mountain bike or commuter (30–50 lb)
- E-bike or cargo frame (50–100+ lb; use reinforced hooks)
- Paired hooks for odd frames or extra security
- Spread loads across multiple anchors to minimize wall stress
Use proper anchors, measure hook spacing, and test before relying on stored bikes.
Minimum Ceiling Clearance
Measure from floor to the lowest beam before you pick a vertical or ceiling-mounted solution so you know the absolute max height you have to work with.
Compare that to the bike’s full height with handlebars and any accessories attached. Add extra room for the lift mechanism or pulleys you’ll use. Leave a few inches of wiggle space so lifting and lowering won’t scrape beams or hangups.
Measure From Floor To Beam
Want to know the minimum ceiling clearance you need? Measure from the finished floor up to the lowest beam or obstruction. Stand at the bike’s parking spot, hold a tape measure vertically, and note the lowest structural element: joists, ductwork, hanging pipes. This will limit vertical space.
Subtract a couple inches for wiggle room so handlebars or pedals don’t graze beams when you lift or tilt the bike. Visualize the bike’s highest point and the path it takes when you move it in: this simple sightline beats unrelated topic detours or random trivia.
Record that clearance and compare it to rack or wall-mount specs before buying. A precise measurement avoids surprises and keeps your storage plan realistic.
Consider Full Bike Height
Ever thought about the bike’s tallest point when you lift it up? Picture hoisting the bike vertically: measure from the floor to the bike’s highest tip with wheels on or off, since saddles, racks, or fenders add inches. Those height considerations tell you if a wall mount or vertical rack fits without scraping ceilings or bending frames.
Mark the ceiling line and locate solid anchor points in joists or studs. Hooks in drywall won’t hold long. If you’re using a pulley or ceiling lift, add clearance for the pulley hardware and an extra 6–12 inches so you won’t bang the ceiling when stowing.
Measure twice, test once: lift the bike where it’ll live to confirm comfortable, damage-free clearance before you drill.
Allow Clearance For Handlebars
How high do your handlebars sit when the bike’s stored upright? Measure from floor to the highest point of the grips with the bike in its storage position. Add at least 2–4 inches of handlebar clearance so you don’t catch cables or mirrors when sliding the bike in or out.
If you hang bikes vertically or use wall mounts, visualize the arc your hands need to clear nearby walls, shelves, or another bike’s bars. Tighter storage density means less wiggle room, so plan placements and measure twice when stacking multiple bikes. Mark ceiling or shelf heights with tape before committing to racks.
Simple measurements save scraped paint, bent levers, and awkward maneuvering in cramped spots.
Account For Lift Mechanism
Thinking about ceiling clearance? Measure from floor to joist and imagine the bike at full height. You want at least a foot of extra room above handlebars and saddle when using a ceiling hoist. Choose a lift mechanism rated for your bike’s weight and install its anchor into a ceiling beam; drywall won’t hold.
If you store outdoors or in an exposed garage, factor outdoor climate considerations: humidity can corrode pulleys and cables, so pick stainless parts or add weatherproofing. Leave enough vertical travel so you can lower the bike without hitting light fixtures or storage shelves. Mark the hoist path and test with the bike fully loaded before finalizing. Proper clearance keeps operations smooth and prevents accidental drops or damage.
Leave Space For Accessories
Want room for lights, panniers, and a helmet without knocking them when you hoist your bike? Aim for minimum ceiling clearance so accessories don’t scrape or swing. Measure your tallest setup: helmet on handlebars, loaded panniers; and add a 20–30 cm buffer. That simple rule helps you leave space around wall mounts or ceiling hoists. It also guides accessory placement for accessories storage like hooks or small shelves nearby.
Check bike lift considerations: some lifts need extra top clearance to pivot or lower without hitting gear. If you store bikes outdoors versus indoors, allow more buffer outdoors for covers and movement in wind. Visualize the bike path up and down, then mark fixed points to avoid collisions and keep things tidy.
Frequently Asked Questions
How Do I Prevent Scratches on Carbon Frames When Stored Vertically?
Use padded contact points and avoid metal-on-carbon contact to prevent scratches. For vertical storage tips, hang by the wheel or use a padded wall mount (cloth, foam, or silicone pads) so the frame doesn’t touch hard surfaces.
Wrap vulnerable areas with frame tape or a soft sleeve. Use rubber-coated hooks or Steadyrack-style cradles. Check mounts regularly, keep the bike clean before hanging, and don’t overload nearby racks to prevent accidental knocks.
Can I Store E-Bike Batteries While Mounted on the Bike?
Yes, you can usually store e-bike batteries while mounted, but do not assume it is always safe. You should follow bike battery safety: keep charge between 20–80%. Store cool, dry, and away from direct sun or heaters. Additionally, avoid metal contact.
Check your e-Bike Storage regulations for buildings or transport rules. If you will leave the bike long-term, remove the battery and store it in a fireproof container or approved cabinet.
Are There Solutions for Storing Bikes With Fat Tires Indoors?
Yes, you can store fat-tire bikes indoors using purpose-built fat tire racks or a compact hoist. Choose wall mounts or floor stands with wider cradles that support big treads and rims. Alternatively, you can use a compact hoist that lifts the bike vertically to free floor space.
Position mounts where tires won’t rub; pad contact points to prevent damage, and leave clearance for handlebars. That keeps bikes secure, accessible, and tidy.
You should combine layered security: install security cameras, use high-quality locks and anchor points, and follow lock sanctions set by the facility.
Position bikes behind locked cages or inside BikeBOX-like units. Register frames with local databases, and use tamper-evident cable ties.
Rotate lock types (U-lock plus chain) to deter bolt cutters, and keep serial numbers and photos handy for police and insurance claims.
Insurance myths, theft deterrents.
Can I Hang Multiple Bikes From a Single Wall Stud Safely?
Yes, you can, but you’ll need to verify stud capacity first. For safe bicycle wall mounting, find a center stud. Do stud strength testing (hammer tap, pilot screw, or stud finder with load test) and use heavy-duty hardware rated for combined bike weight.
Space hooks or a multi-bike wall rack so loads distribute across two studs when possible. Tighten all fasteners, check periodically, and avoid drywall-only mounts or single light screws.
Conclusion
Wrap up by measuring and planning before you buy: note wall-mounted rack dimensions and hook load limits. Then check minimum ceiling clearance and floor-to-beam distance. Think about full bike height with handlebars and any lift mechanism you’ll use. Leave room for pumps, helmets, and locks.
Visualize the finished setup so bikes don’t block doors or paths. With careful measuring and a bit of clearance, you’ll fit bikes in small spaces without hassle.
Related reading: 9 Best Bike Racks for Fat Bikes in — a closer look at this topic.