Thru Axle Vs Quick Release Compatibility Guide
You need to match axle type, diameter, spacing and end-cap interface precisely.
Quick-release hubs use 9 mm skewers and 100/130/135 mm spacing; while thru-axles are 12–15 mm with 100/110 front and 130/142/148 rear standards. Boost vs non-boost matters. Measure OD, thread pitch and hub bore, confirm end-cap/removable cap type, and torque axles to manufacturer spec.
Adapters can work but must fit tolerances or they’ll bind. Continue for step-by-step checks and installation details.
Quick Overview
- Measure axle diameter and OLD: QR ≈ 9 mm; thru-axles commonly 12–15 mm with 100/110 front, 130/135/142/148 rear spacing.
- Match thread pitch, thread engagement depth, and end-cap type; mismatches bind or fail to seat.
- Use removable end caps or hub-specific adapters that convert bore sizes while preserving bearing preload.
- Follow manufacturer torque and axle-length specs to ensure correct preload, clamp force, and avoid stripped threads.
- Verify rotor/caliper clearance, axle runout, and that adapter faces seat squarely into frame/fork recesses.
Axle Type, Diameter & Spacing
Wondering which axle fits your wheel and frame? You’ll check axle diameter and frame spacing first. Measure diameter with calipers (QR ≈9mm; TA 12–15mm) and OLD across locknuts (100/110 front, 130/135/142/148 rear). Match thread pitch and end-cap type; mismatches bind or won’t seat.
| Position | Common TA dia | Common spacing |
|---|---|---|
| Front | 12mm, 15mm | 100mm, 110mm |
| Rear | 12mm (142/148) | 130mm, 135mm, 142mm, 148mm |
| Notes | Check pitch (1.0–1.75mm) | Boost vs non-Boost matters |
You’ll avoid adapters unless specs align. When in doubt, consult frame manual or measure precisely to ensure direct thread engagement and safe wheel retention.
Torque & Thru-Axle Length
How tight should a thru-axle be, and how does length affect engagement and clamping? You should follow manufacturer torque specifications because torque considerations control preload, thread strain, and secure engagement. Too little torque lets the hub shift; too much risks stripping threads or bending the axle.
Thru axle length influences thread engagement and clamp span: a longer axle with correct thread depth increases mechanical advantage and stiffness, while an undersized axle can under-engage threads and reduce security.
- Check frame/fork spec and torque wrench settings before installation.
- Confirm thru axle length matches hub and dropout stack; mismatches alter clamp force.
- Apply a calibrated torque value; recheck after initial rides.
- Use anti-seize on alloy threads per manufacturer to protect specifications.
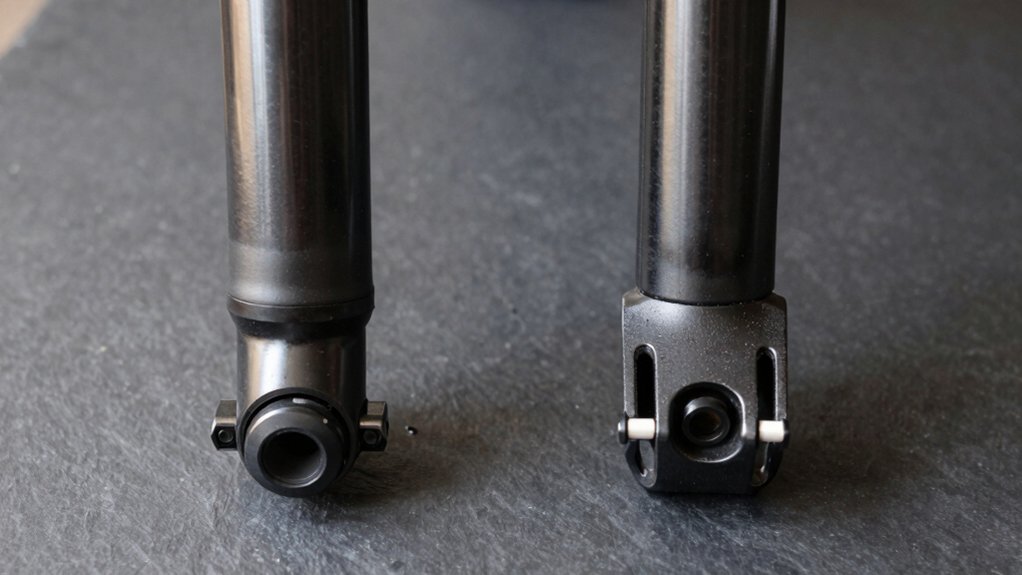
End Caps and Adaptors
You’ll first identify the end cap type on your hub: push-in, threaded, or bolt-on. Then measure hub width and axle interface to confirm fit.
Follow adapter installation steps precisely: remove existing caps, press or thread the correct adapter into the hub, and torque per manufacturer specs. Check material and strength ratings and verify compatibility with your frame/fork and axle standard before riding.
End Cap Types
Which end cap your hub uses matters more than you might think when swapping wheels or converting axle standards. You’ll encounter pressed, threaded, and removable end caps that define axle bore size and interface with adapters.
Pressed caps are simple friction-fit pieces for quick service, but they offer limited modularity. Threaded caps screw into the hub and provide secure seating for thru-axle assemblies; they’re common where precise axle preload matters.
Removable caps allow you to swap in adapters that convert a hub from a 12mm thru-axle to a 9mm QR or from 135mm to 142mm spacing, depending on hub design. When choosing caps or adapters, verify material, sealing, and manufacturer tolerances to maintain alignment and bearing preload.
Measuring Hub Width
After you’ve identified the end cap type and adapter options, measure the hub width to determine compatible axle standards and spacers. Use digital calipers to measure internal face-to-face width across the sealed bearing seats, not external flanges. Record hub over locknut dimension (OLD) or actual flange-to-flange where specified by the manufacturer.
Note if end caps are removable; measure with caps installed and with them removed to log both configurations for adapters. For rear hubs, measure for cassette clearance and axle threading engagement depth. Perform compatibility checks against frame/fork dropout spacing (e.g., 100/12, 110/15, 142/12, 148/12 Boost). Document tolerances to decide required spacers or alternative end caps without proceeding to installation steps.
Adapter Installation Steps
How do you fit end caps and adapters without introducing alignment errors? You begin by confirming adapter compatibility with both hub and frame compatibility specifications. Clean mating surfaces, then seat end caps squarely on the hub flanges: don’t force them at an angle.
Use the factory tools or a low-torque press to avoid deforming splines. Install the adapter into the fork or dropout, checking that its locating face fully engages the frame recess; a visible gap signals mismatch.
Thread or press the thru axle slowly while monitoring rotor-to-caliper clearance and axle runout with a dial indicator or visual check. Tighten to manufacturer torque in incremental steps, recheck alignment, then torque final value.
Verify quick spin for smooth, concentric rotation before riding.
Material And Strength
Material choice for end caps and adapters directly governs load capacity, wear resistance, and interface stability. You should prioritize high-strength alloys or engineered composites that match the hub and frame’s stiffness and fatigue limits. Use 7075-T6 aluminum or chromoly for metal caps where stiffness and predictable fatigue life matter. Consider titanium for weight-critical, high-cost builds.
Thermoset composites or reinforced polymers can work for lower-load applications, but they require careful inspection for creep and abrasion. Surface treatments (anodizing, hard-coat) reduce galling at interfaces. Thread and bearing-seat tolerances must align with material elastic moduli to avoid fretting. Always perform material and strength validation against manufacturer torque and load specs. Include compatibility checks when selecting adaptors to ensure safe mating and long-term durability.
Compatibility Checks
Having chosen end-cap and adapter materials that match your hub and frame stiffness, you now need to verify physical and functional compatibility before assembly. Check that axle length matches hub and frame specifications; measure from shoulder to end and confirm clearance for rotor and caliper spacing.
Confirm end-cap bore dimensions align with hub flange tolerances to avoid preload shifts. Verify adaptor seating faces are square and perpendicular to axle axis to prevent misalignment. Cross-reference threading standards between axle, adaptor, and frame or fork: M12, M15, or proprietary pitches must coincide.
Inspect retention interfaces for proper engagement depth and torque specs. Finally, test-fit components on the unloaded bike to confirm smooth insertion, full thread engagement, and correct wheel centering.
Frequently Asked Questions
Can I Convert My QR Hub to a Thru-Axle Hub Without Replacing Wheels?
Yes, you can sometimes convert a QR hub to thru-axle without replacing wheels, but expect convertibility tradeoffs and compatibility pitfalls. You’ll need specific end-cap or adapter kits matched to hub model, axle spacing, and frame/fork spec.
Adapters add weight; they may reduce stiffness and can affect alignment or brake rotor position. Verify hub manufacturer support, axle diameter/length, and torque specs before fitting to avoid unsafe installation.
Will Thru Axles Work With Rim Brakes as Well as Disc Brakes?
Yes, thru axles work with rim brakes, but you should clear thru axle misconceptions: axle type doesn’t dictate brake type. You’ll need frame and fork dropout spacing and hub endcaps designed for the thru axle diameter and length.
Rim brake calipers must align properly with the wheel’s rim. Thru axles add stiffness without affecting rim brake function; however, some older rim-brake frames won’t accept modern thru-axle standards.
Do Thru Axles Require Different Axle-To-Frame Alignment Checks?
Yes, you’ll check alignment differently. With through axle compatibility, you’re ensuring axle bore, thread pitch, and dropout faces align precisely so the axle threads smoothly and the wheel sits centered. You’ll torque the thru axle to spec and verify rotor-to-caliper clearance and chainline.
If you’re doing a quick release replacement, inspect dropout spacing and alignment. However, QR systems tolerate slight play that thru axles won’t accept.
Are There Theft-Prevention Options Unique to Thru Axles?
Yes, you can use thru axle theft deterrents that quick release compatibility lacks. You’ll fit security thru axles with tamper-proof heads (Torx, pin-in-hex), locking skewers, or bolts requiring specific tools. These tools screw directly into the frame so wheel removal is far harder.
These systems exploit thru axle threading for greater retention and resistance to theft. However, you’ll need to confirm frame and hub specs for proper fit and tool compatibility.
Do Thru Axles Affect Wheel Truing or Hub Bearing Maintenance?
Yes, thru axles can influence wheel truing and bearing maintenance. You’ll notice improved alignment due to solid threading compatibility with the frame, which reduces lateral play and makes truing more consistent.
Bearing maintenance is unchanged in procedure; however, you’ll need to remove the thru axle (often with an Allen key) to access hubs. Ensure torque and thread engagement are correct after service to preserve alignment and bearing life.
Conclusion
You’ve now got the essentials to match thru-axles and quick-release hubs: check axle type, diameter, and spacing. Verify torque and thru-axle length; inspect end caps and adaptors; and confirm material strength. Measure hub width accurately and follow adapter installation steps precisely.
Always compare manufacturer specs and test for secure fit before riding. Taking these technical steps prevents axle misfit, preserves hub integrity, and keeps wheel alignment and safety uncompromised.