Road Ride Preparation Checklist

Before you head out, check tire pressure against the sidewall range and inflate to match tire width, rider load, and rim limits. Rear tires usually need 3–10 psi more.
Keep typical pressures: 28–32 mm road tires 45–79 psi, gravel 30–60 psi. Verify valve stem torque with a calibrated wrench; follow the manufacturer spec and torque sequence. Then recheck after the first ride.
Do these steps and you’ll ride safer and more comfortably; keep going for specifics.
Quick Overview
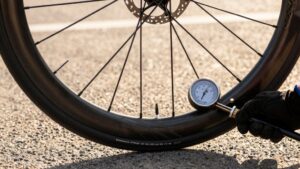
- Check tire pressure with a reliable gauge and inflate within the manufacturer sidewall range for your tire width and rim limits.
- Set rear tire 3–10 psi higher than front to compensate for additional rider and cargo load.
- Verify valve stem torque using a calibrated torque tool; follow manufacturer spec and recheck after your first ride.
- Confirm tire psi stays below hookless rim limits (≤72.5 psi) and don’t exceed stated rim or tire maximums.
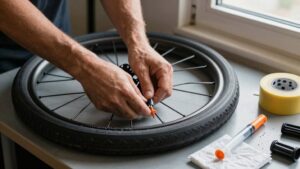
- Inspect tires for cuts, embedments, and proper seating. Carry a pump, spare tube/patch kit, and multi-tool.
Tire Pressure & PSI Chart
Wondering what PSI you should run? You’ll use tire inflation to match tire volume, rider weight, and rim limits. Start with the manufacturer’s sidewall range. Then lower pressure for more comfort or wet grip; raise it for smooth roads and speed. Remember, rear tires need 3–10 psi more due to load. Don’t exceed hookless rim limits.
| Tire Width | Typical PSI | Notes |
|---|---|---|
| 28 mm | 45–65 | Good balance |
| 30 mm | 45–64 | More volume, lower PSI |
| 32 mm | 53–79 | Higher comfort |
| Hookless limit | ≤72.5 | Safety cap |
Check pressure with a reliable gauge before rides to prevent pinch flats and improve handling.
Minimum PSI by Tire Type
How low should you go before risking a flat or poor handling? You’ll use a psi chart for baseline tire pressure; then adjust for load and road. Follow manufacturer specifications for minimum PSI by tire type: narrower road tires run higher, wider tires lower. Don’t guess; check the printed range.
- Road (23–28 mm): 80–110 psi — Start mid-range, adjust for feel and weight.
- Endurance/25–28 mm: 65–95 psi — Firmer prevents pinch flats on rough roads.
- Gravel/32–40 mm: 30–60 psi — Lower improves traction without burping on tubeless.
- Commuter/touring: 40–70 psi — Prioritize comfort and puncture resistance.
Also observe valve stem torque. Use correct torque and torque sequence on related fittings; recheck after ride.
Valve Stem Torque Spec
Check the valve stem torque spec before you inflate so you use the correct torque value from the manufacturer. Use a calibrated torque tool and follow the proper torque sequence order if your wheels have multiple stems. Then tighten to spec.
Recheck torque after your first ride to confirm nothing worked loose.
Correct Torque Value
Why does the correct valve stem torque matter? You need consistent torque to prevent leaks, avoid stem damage, and keep tire pressure reliable during a ride. Use a calibrated torque wrench and follow safe tightening steps: hand-thread, snug, then apply the specified torque in one smooth motion.
Don’t over-torque; that risks cracking the rim or stripping threads. Under-torquing allows slow air loss and wobble. Check torque when you install new tubes, after wheel truing, or following impacts. Record values as part of routine torque safety checks alongside crank maintenance and other bolt inspections.
If you ever doubt fitment or feel play after tightening, stop riding and inspect or replace the stem or rim.
Manufacturer Specifications
Manufacturer specifications give the exact valve stem torque you should use to secure Presta or Schrader stems without risking leaks or rim damage. You should follow them every time you replace a tube or service a wheel. Check the rim or hub manual for the torque value and any threadlocking notes before you start.
You’ll tighten the valve nut or cap to that spec: no guessing, no over-torquing. If the manual is missing, consult the manufacturer’s website or contact support. Don’t rely on an irrelevant topic or forum post that mixes advice from a random pairing of components. Record the value with your wheel’s service notes so you and any mechanic can repeat the correct setting.
Proper Torque Tool
When you’ve noted the valve stem torque spec from the rim or hub manual, grab a calibrated torque wrench or a small preset torque driver that covers the low range specified for valve nuts (typically 0.5–2 Nm for many rims).
Use the tool to snug valve nuts to the exact spec; too loose risks movement and seal failure. Too tight can damage the valve or rim. Work on one wheel at a time, checking that valve orientation won’t interfere with tire seating.
While you adjust, glance at spoke tension indicators and the wheel’s lateral true. Improper torque on accessories can misleadingly suggest spoke or rim issues. After torquing, confirm chain alignment and quick-release lever positions before final ride checks.
Torque Sequence Order
Although valve stem torque specs are small, you should follow a deliberate torque sequence order to avoid valve damage and ensure an airtight seal. Start by hand-tightening the valve nut. Then, use a calibrated torque tool to apply the specified inch-pounds in small increments.
Tighten in a cross-pattern if multiple stems or mounting bolts exist, pausing to verify alignment after each pass. Watch for subtopic misalignment; don’t skip steps because a previous section seemed obvious. Use consistent torque increments (e.g., 1–2 in·lbs per pass) until you reach the spec. Avoid over-torquing, which can strip threads or deform seals.
Record final values briefly; this simple log beats relying on off-topic analytics for confirmation.
Recheck After Ride
You tightened the valve nut in controlled increments and logged the final values. Now, recheck the valve stem torque after your ride to confirm nothing loosened under load. After warming the wheels during your ride, park on level ground. Deflate slightly if needed, and use a calibrated torque wrench to verify the stem nut matches the spec you recorded.
Compare readings to your maintenance log and note any deviation in the post-ride checklist. If torque dropped beyond tolerance, retighten in small steps, recheck, and inspect the stem and valve for damage or seating issues. Record corrective actions and torque after adjustment.
Consistent checks protect the tube and rim and prevent sudden air loss on future rides.
Frequently Asked Questions
Do I Need to Carry a Spare Chain Link?
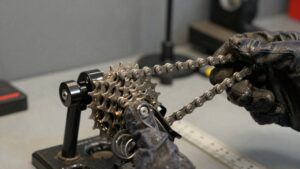
Yes, you should carry a spare chain link. You’ll fix a broken chain quickly with a replacement link and a chain tool; this will help you avoid a long walk.
Also, pack tire sealant or a spare tube and pump for punctures. Keep the link, chain tool, and sealant in a saddlebag or jersey pocket so you can make roadside repairs and get back riding without wasting hours.
How Often Should I Replace My Helmet?
Replace your helmet every 3–5 years and immediately after any impact to protect helmet safety and your head. You’ll also inspect for cracks, crushed foam, or loose straps during routine checks. If anything’s damaged, don’t hesitate to replace it sooner.
Keep gear sanitation in mind: clean the liner and straps regularly and let the helmet air-dry to prevent odor and material breakdown. This can shorten replacement frequency.
What’s the Best Way to Pack Nutrition for Long Rides?
Pack nutrition by staging easy-access items for steady fueling. Use packing strategies like seatbag for tools, frame bags for bars, and jersey pockets for quick snacks.
Prioritize on bike nutrition: small, frequent portions (every 20–30 minutes); mix carbs with electrolytes, and stash energy gels and chews up front. Keep a spare recovery snack and a sealed bottle of electrolyte drink.
Test positions and portions on training rides.
Can I Ride With Clipless Shoes if I’M a Beginner?
Yes, you can ride with clipless shoes as a beginner. Start with beginner guidance: practice clipping in and out on a stationary trainer or grass. Adjust cleat position and pedal tension, and ride short loops until it feels natural.
Wear shoes that fit well. Carry a spare pair of flats if nervous, and lean forward to unclip before stopping. You’ll gain power and control with consistent practice.
How Do I Sanitize Gear After a Wet Ride?
You should sanitize gear after a wet ride by following cleaning protocols: rinse mud and salt off immediately. Wash clothing and pads in hot water with detergent, and air-dry or tumble-dry per labels.
Clean helmet padding with mild soap. Disinfect straps and gloves with an approved spray, and wipe shoes and saddles with antibacterial wipes. Store everything dry and ventilated to prevent mold.
Maintain gear hygiene by inspecting and replacing damaged items.
Conclusion
You’ve checked tire pressure against the PSI chart, confirmed minimum PSI for your tire type, and tightened valve stems to spec using the correct torque value from the manufacturer. You used an appropriate torque tool and followed the torque sequence order; so everything’s secure.
Before you hit the road, recheck pressures and valve stem torque after a short ride to catch settling or leaks. Do this routine every time to ride safely and confidently.