How to Descend Safely on a Road Bike
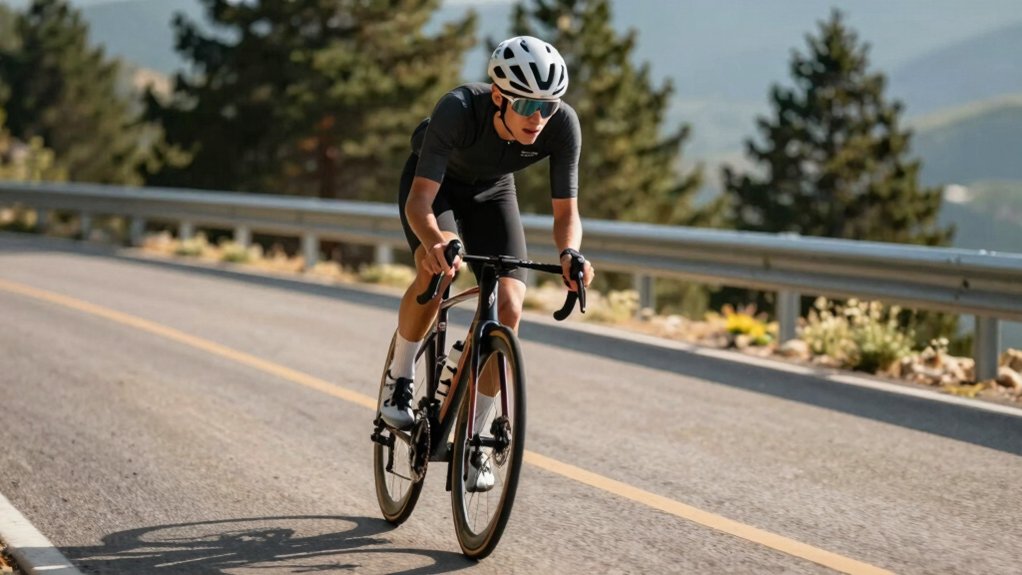
You’ll descend faster and with more control when you get low and compact: hands on the drops, elbows and knees bent, weight slightly rearward and center of gravity low.
This position allows you to absorb bumps and steer precisely.
Use both brakes: modulate rear for stability and add front progressively to bleed speed before corners.
Approach wide, clip the apex, and exit wide while keeping eyes far ahead and scanning for hazards.
Keep practicing these drills and setup checks to build confidence and skill.
Quick Overview
- Adopt a low, compact body position with elbows tucked, knees flexed, and hands ready near the brakes to lower your center of gravity.
- Modulate both brakes smoothly; use the rear for stability and increase front pressure progressively to control speed before turns.
- Enter wide, clip the apex, and exit wide while keeping weight over the outside pedal. Let the bike lean beneath you.
- Look well ahead; scan surface texture and traffic, and use vision to guide small, deliberate steering inputs.
- Warm up with low-speed brake drills. Check tire pressure and brake reach; practice emergency slow-downs calmly and predictably.
Get Your Body and Hands Right to Descend Safely
When you drop into a descent, get your hands in the drops with fingers near the brake levers, elbows bent and tucked, and knees slightly flexed. This lowers your center of gravity and gives you immediate access to braking while keeping the bike stable. You’ll adopt a compact hand grip that’s firm but relaxed; this lets your forearms absorb bumps while retaining precise control.
Keep a deliberate shoulder tuck so your upper body presents low aerodynamic drag without locking the neck. That keeps your vision forward and your weight centered. Shift weight slightly rearward on steep pitches, keep feet level with even pedal pressure, and unweight the saddle just enough for compliance.
Practice this posture progressively until it feels natural and repeatable.
Brake to Descend Safely: When and How to Use Front + Rear
Because good braking beats panic, learn to use both front and rear brakes deliberately so you control speed without upsetting balance. You’ll use the rear brake first to scrub speed on straight, less steep sections; then add front progressively for stronger deceleration.
Practice brake timing: small, firm inputs rather than grabbing. Bleed off speed before turns and modulate as gradient changes.
Maintain brake balance: roughly 60/40 front/rear on moderate descents, more front on steep slopes; however, never lock either wheel. Keep fingers on levers in the drops, elbows bent, weight slightly back so braking shifts load predictably. If traction falls, ease front pressure and rely more on the rear.
Train this sequence on quiet roads until it’s instinctive and controlled.
Pick and Ride the Best Line Through Corners
Now that you’ve practiced balanced braking and keeping fingers on the levers, focus on choosing a line that lets you carry the speed you’ve controlled. You’ll approach wide, clip the apex, and exit wide to straighten the path and keep tire grip consistent.
Match your speed to surface grade: slower on rough or steep sections, faster where smoothness and traction allow. Keep weight over the contact patch; outside pedal down, inside pedal up; and let the bike lean beneath you.
Read the road for debris, crown, and camber. Avoid late corrections. Practice lines at modest speed; then build confidence. Use small adjustments in body position rather than sudden steering inputs to maintain stable, predictable cornering.
| Calm | Confident |
|---|---|
| Focus | Flow |
| Control | Release |
Look Where You Want to Go: Vision, Awareness, and Lane Position
Scanning far ahead keeps you smooth and decisive on descents: look through the corner toward the exit rather than at your front wheel. Let your eyes lead your line, and use that gaze to anticipate road crown, debris, and traffic so you can choose the safest lane position early and make only small, controlled inputs. You’ll use deliberate gaze direction to steer; the bike follows where you look.
Perform an environmental scan constantly. Check pavement texture, drainage grates, parked cars, and oncoming traffic. Shift lane position proactively to maximize margin for error and to present clear presence to drivers. Keep head and shoulders aligned with intended path, relax your grip, and trust small steering corrections guided by vision to maintain speed and stability.
Practice Drills & Setup Checklist (With Quick Fixes)
Starting with a short, structured routine will build the muscle memory and confidence you need for safe descents. Warm up on flat pavement, practice brake modulation in the drops at low speed, then progress to controlled cornering drills (outside–inside–outside lines) on a quiet loop.
Schedule drill timing: 10 minutes warm-up, 15 minutes brake drills, 20 minutes cornering repeats, rest, and repeat. Use checklist tweaks before each session: tire pressure, brake reach, saddle height, quick-release tightness, and headset play.
Practice with progressive intensity, keeping hands in the drops and practicing pedal positions. Quick fixes include lowering the saddle slightly, adjusting brake reach with small turns, and bleeding or pad-checking brakes if modulation feels spongy. Review and repeat consistently.
Frequently Asked Questions
You’ll find clear answers here on braking techniques, cornering lines, body position, and handling emergencies so you can descend with confidence.
I’ll explain when and how to use both brakes; I will also cover how to pick and ride the safest line through turns. Additionally, I will explain how to balance and shift weight for stability. Expect concise, practical tips for sudden hazards and recovery so you can react correctly when things go wrong.
Braking Techniques Explained
How should you use your brakes when descending fast? You’ll apply both brakes smoothly, favoring the front for steep sections while modulating the rear to stabilize speed.
Pulse braking: short, firm compressions let pads cool and reduce brake fade on long runs. Know your pad materials: organic pads bite quickly but wear faster and heat up; sintered pads tolerate heat but require more lever travel.
Position your fingers on the levers in the drops so you can feather brakes precisely without gripping hard. Brake before hazards and fully release through corners. Don’t brake while leaned over.
In wet or gravelly conditions, brake earlier and lighter to avoid lockup. Practice progressive pressure and brief releases to maintain traction and confidence on technical descents.
Cornering And Line Selection
Why choose an outside-inside-outside line when cornering? You’ll maintain speed and control by maximizing turn radius, using an apex strategy to straighten the path and reduce lean. Approach wide, clip the apex, and exit wide to keep edge traction high.
- Start wide to preserve speed and plan braking before the turn.
- Aim for the apex to shorten the turning arc and stabilize roll angle.
- Exit wide to reapply power while keeping tire contact consistent.
You should keep the inside pedal up and pressure on the outside leg entering the turn. Guide the bars subtly while looking through the exit. Avoid braking while leaned over.
Practice the line at moderate speed until it’s automatic: it’s the safest, fastest option.
Body Position And Balance
Although a stable body position feels subtle, it’s the foundation for safe, fast descents: keep your hands in the drops with fingers near the levers, elbows and knees bent and tucked, and your weight slightly rearward so the bike’s contact patches stay confident under braking and in turns.
You’ll focus on core stability to hold that shape without gripping the bars; a strong midsection keeps you aligned as the bike moves beneath you. Keep your feet level and apply even pedal pressure when required, unweighting slightly over rough sections.
Use breath control to stay calm, exhaling on heavy braking or into turns to prevent tension. Practice this posture incrementally on easy descents until it becomes automatic and reliable.
Emergency Handling Tips
When you face an unexpected situation on a descent, stay calm and apply a few practiced responses to keep control and buy time. You’ll prioritize stability, slow predictably, and communicate if riding with others. If a spoke failure occurs, grip both brakes gently, shift weight rearward, and pedal lightly to a safe stop; avoid hard braking or sudden turns.
For crashes, check for injuries before moving. If you can’t ride, signal for help.
- Maintain eyes up, settle into drops, and use progressive braking to reduce speed.
- Carry a compact repair kit and know simple roadside rescue techniques for quick fixes.
- Practice emergency dismounts and controlled skids in a safe area.
Conclusion
You’ve learned the essentials to descend with control: set a low, balanced body and firm hands. Use both brakes smoothly: rear to modulate, front for stopping power. Choose the cleanest line and look where you want to go. Practice drills while keeping your bike setup dialed.
Start slow, build confidence, and fix issues early. With focused practice and attention to technique, you’ll descend faster, safer, and more confidently every ride.
Related: Braking in Rain on a Road